DDS
DDS(Data Distribution Service)是一套通信协议和 API 标准;它提供了以数据为中心的连接服务,基于发布者-订阅者模型。这是一套中间件,它提供介于操作系统和应用程序之间的功能,使得组件之间可以互相通信。并且提供了低延迟,高可靠的通信以及可扩展的架构。
DDS本身是一套标准。由Object Management Group(简称OMG)维护。OMG是一个开放性的非营利技术标准联盟,由许多大型IT公司组成:包括IBM,Apple Computer,Sun Microsystems等。但OMG仅仅负责制定标准,而标准的实现则由其他服务提供商完成。目前DDS的提供商有很多:Vortex OpenSplice,eProsima Fast RTPS,Hamersham,Company Summary Kongsberg Gallium,MilSOFT,Object Computing OpenDDS,Remedy IT,RTI,Twin Oaks Computing, Inc.。
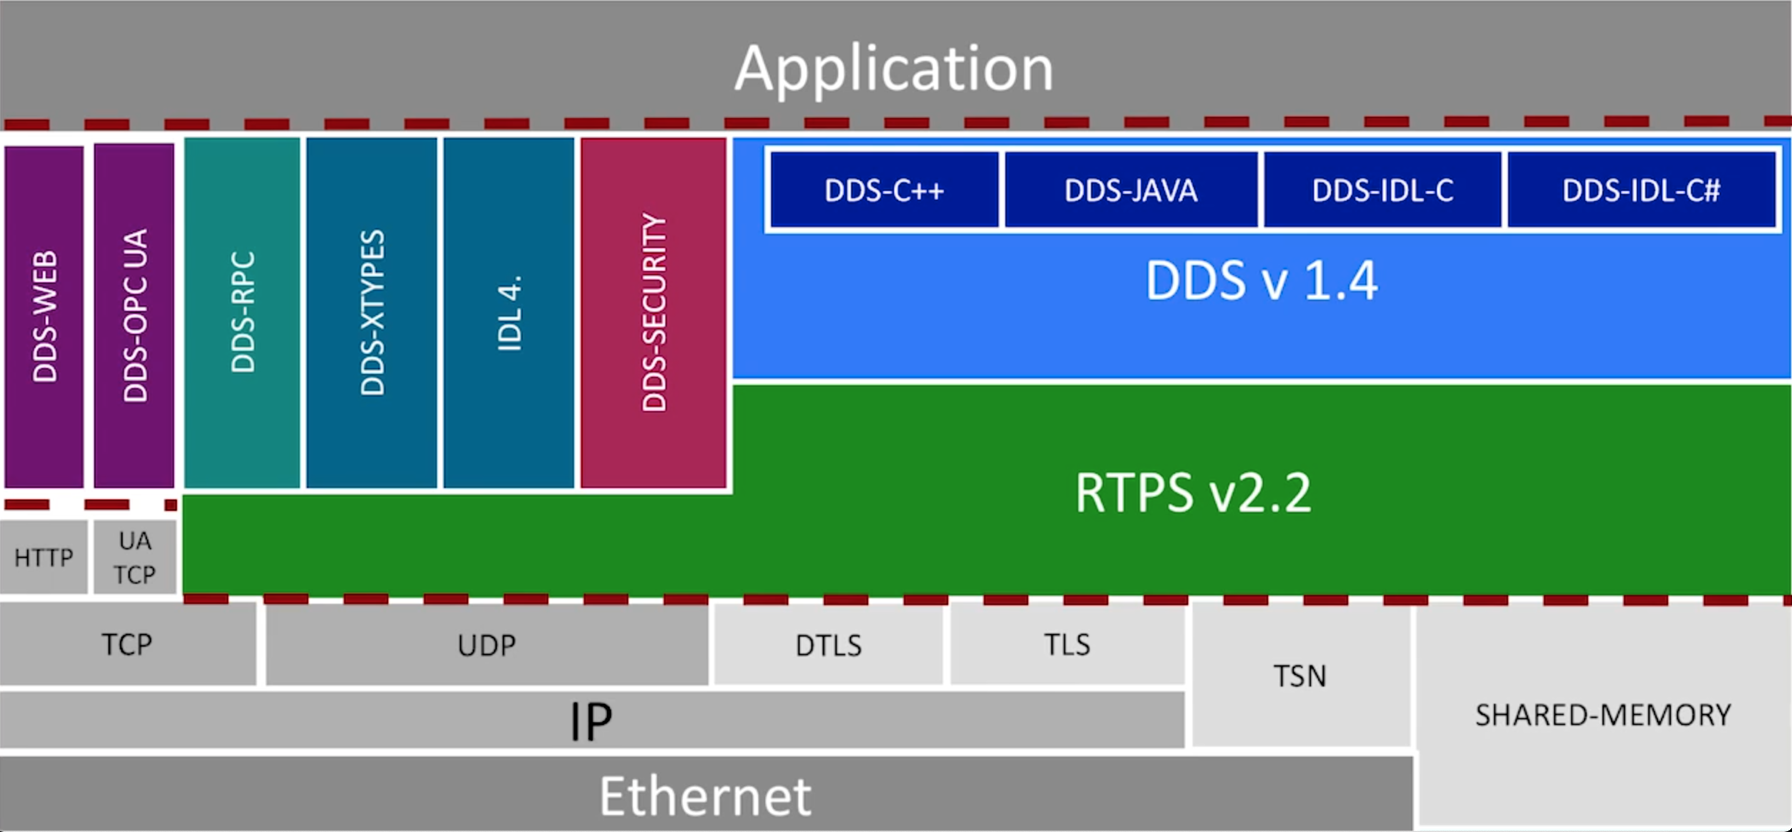
DDS 在网络栈中的位置
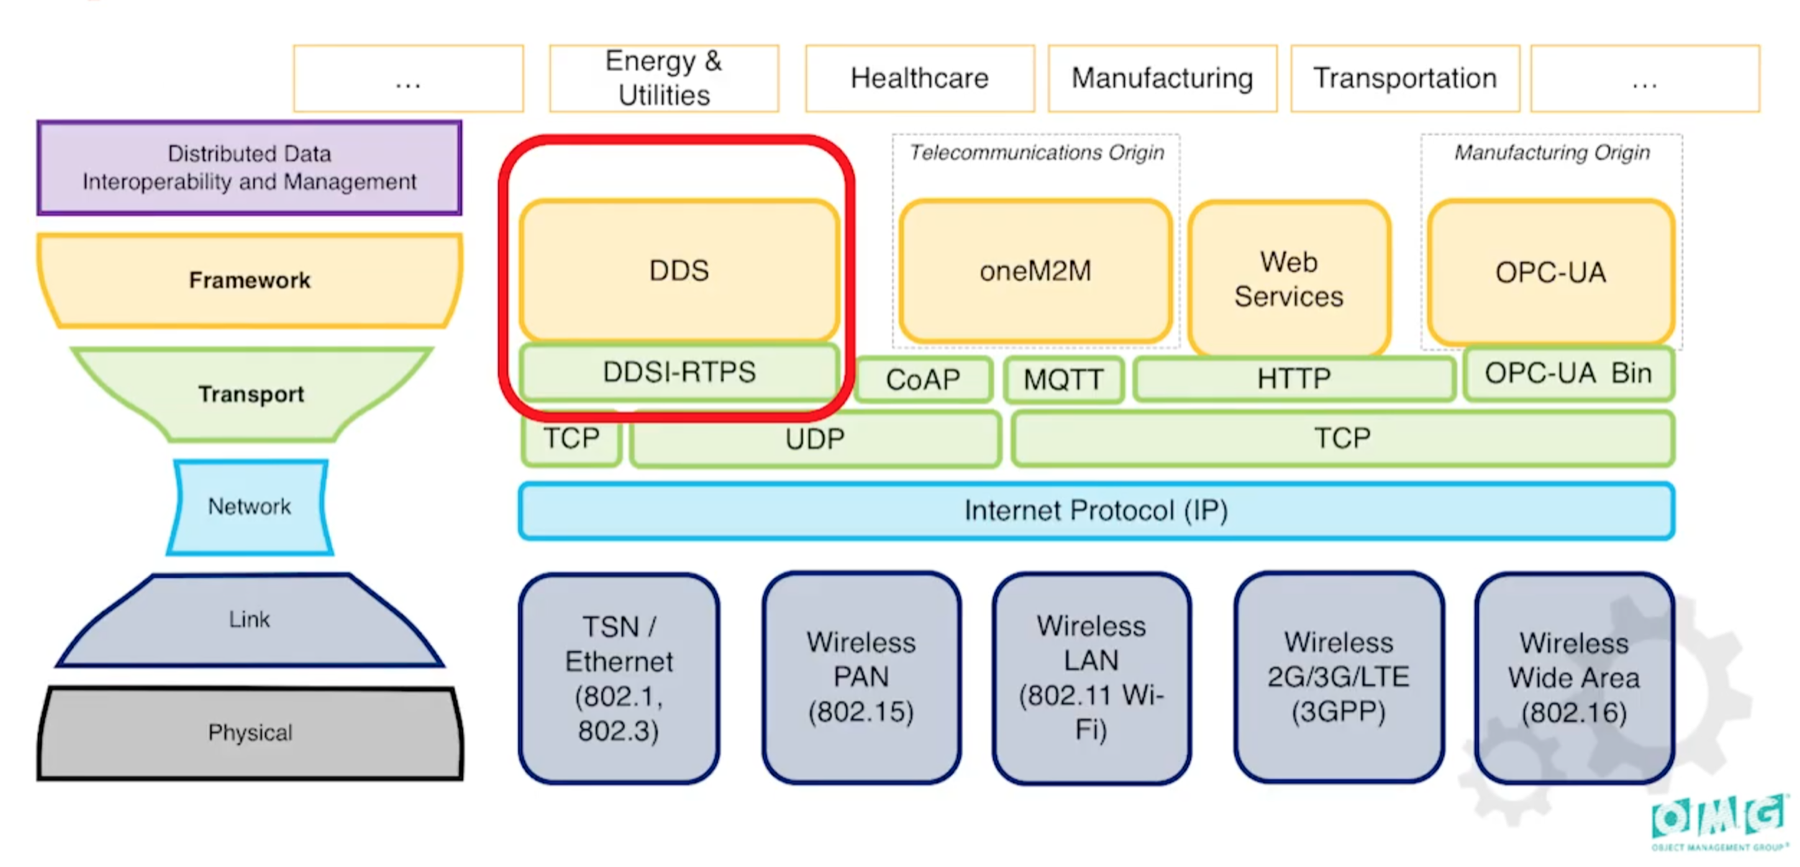
这个图之所以是沙漏形状是因为:两头的技术变化都发展很快,但是中间的却鲜有变化。
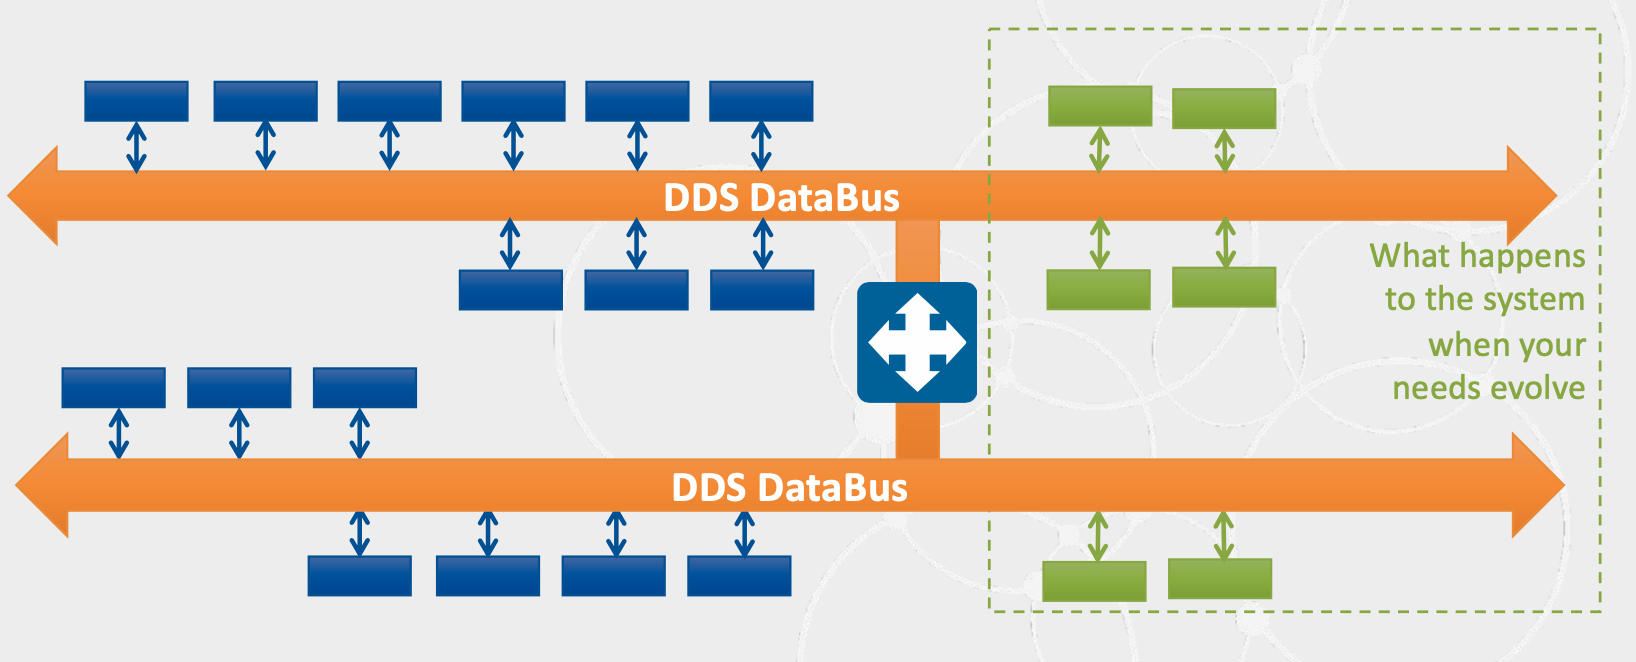
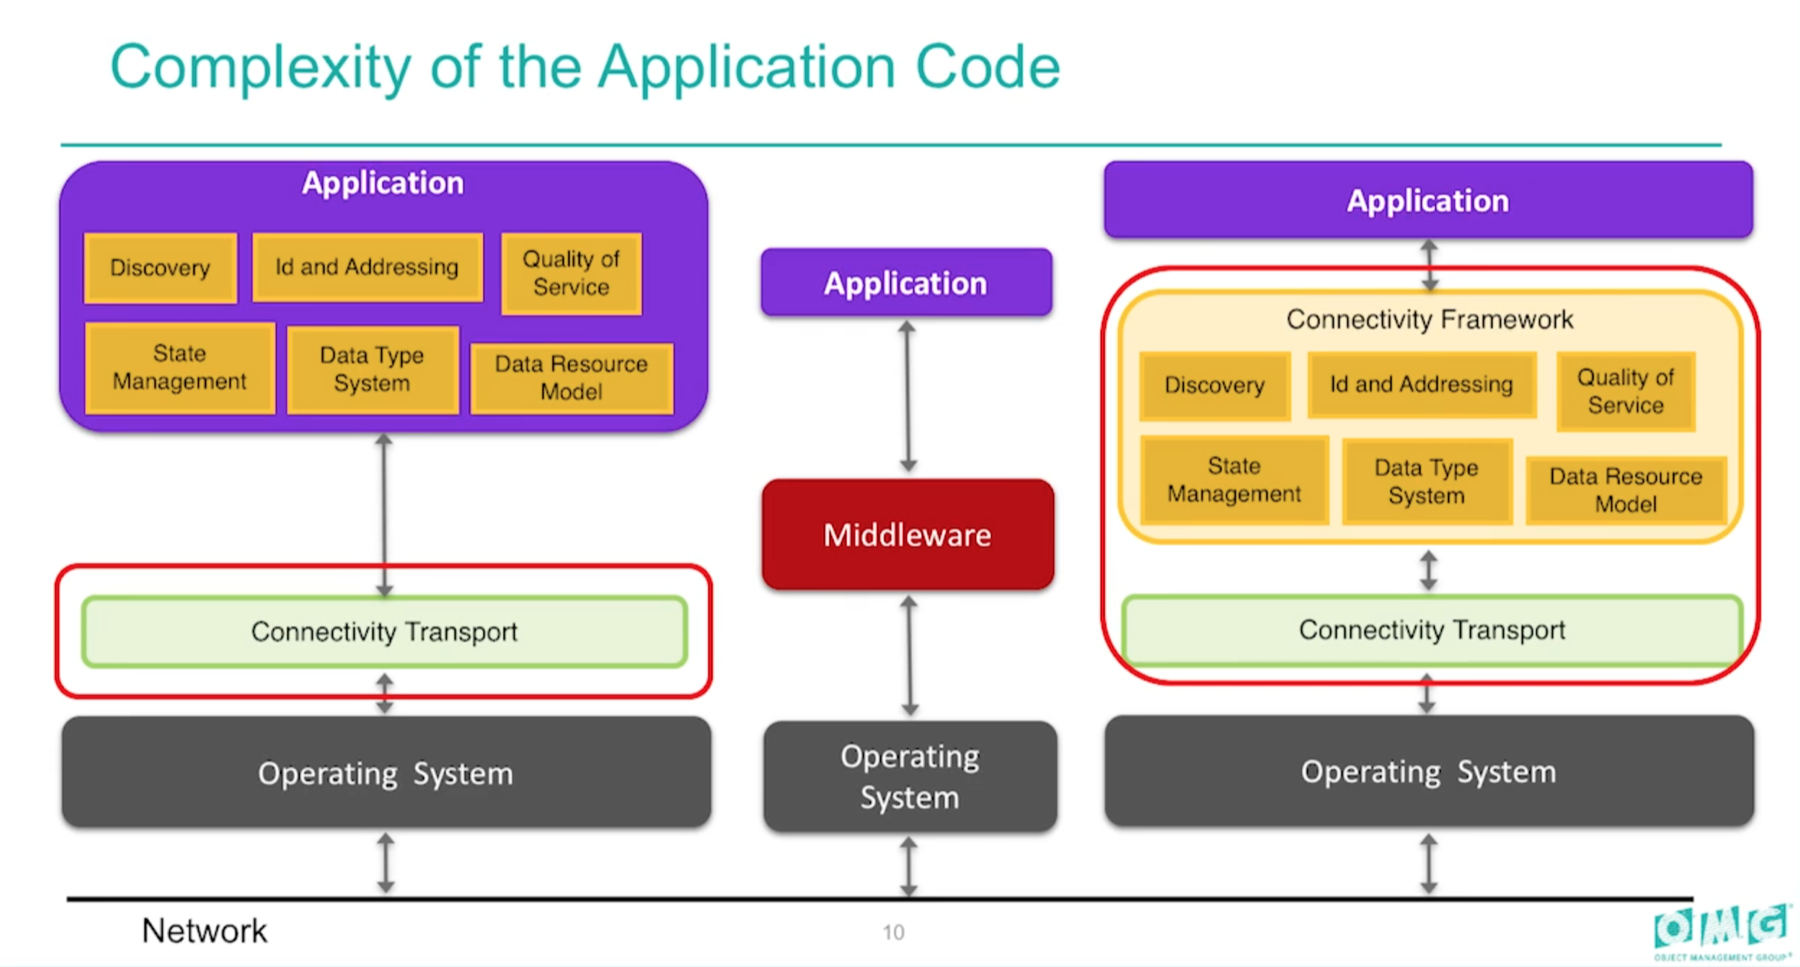
DDS 如何降低系统复杂度
-
传统分布式系统采用点对点的方案,会面临通道数量爆炸式增长问题:

-
而采用 DDS,拥有统一的 DDS DataBus,随着新节点的加入,不会增加拓扑的复杂度;
-
采用基于 DDS 的上层应用,能极大简化复杂度:
FastDDS
eProsima Fast DDS 目前已经被选为 Robot Operating System 2 (ROS 2) 系统的默认中间件并且被包含在最新发布版本Foxy Fitzroy中。
特性
- 两个 API 层:包含专注可用性的上层DDS层,以及聚焦通道的底层RTPS层;
- 实时性(即插即连):提供实时特性,无论是发现,上线,下线,发送消息都能实时响应,并支持随时入网/出网;
- 同步/异步的数据发送模式;
- 可靠通信:即使在UDP通道上,也可支持可靠的通信范式;此外,也可以采用 TCP 通道;
- 传输层:UDPv4, UDPv6, TCPv4, TCPv6, SHM;
- 安全:可配置的安全通信,实现3个方面的安全配置:远程校验,访问控制,数据加密;
- 灵活性&拓展性:DDS 建立在全局数据空间的概率上,有良好的灵活性以及拓展性;
- 可移植性:通用的 RTPC 协议支持各 DDS 实现的互通,同时也支持写一遍代码运行于多个平台;
- 可配置:可以通过代码或者 XML 文件进行配置;
- 高性能:采用 FastCDR 作为序列化库;
- 统计模块
- 流量控制
- 免费开源
架构
如下图所示,FastDDS 大致可分为4层:

-
应用层:提供用户友好的 API
-
FastDDS 层
-
以数据为中心的模型,虚拟出全局数据空间的概念,各节点向该空间声明发布者或者订阅者的意图;
-
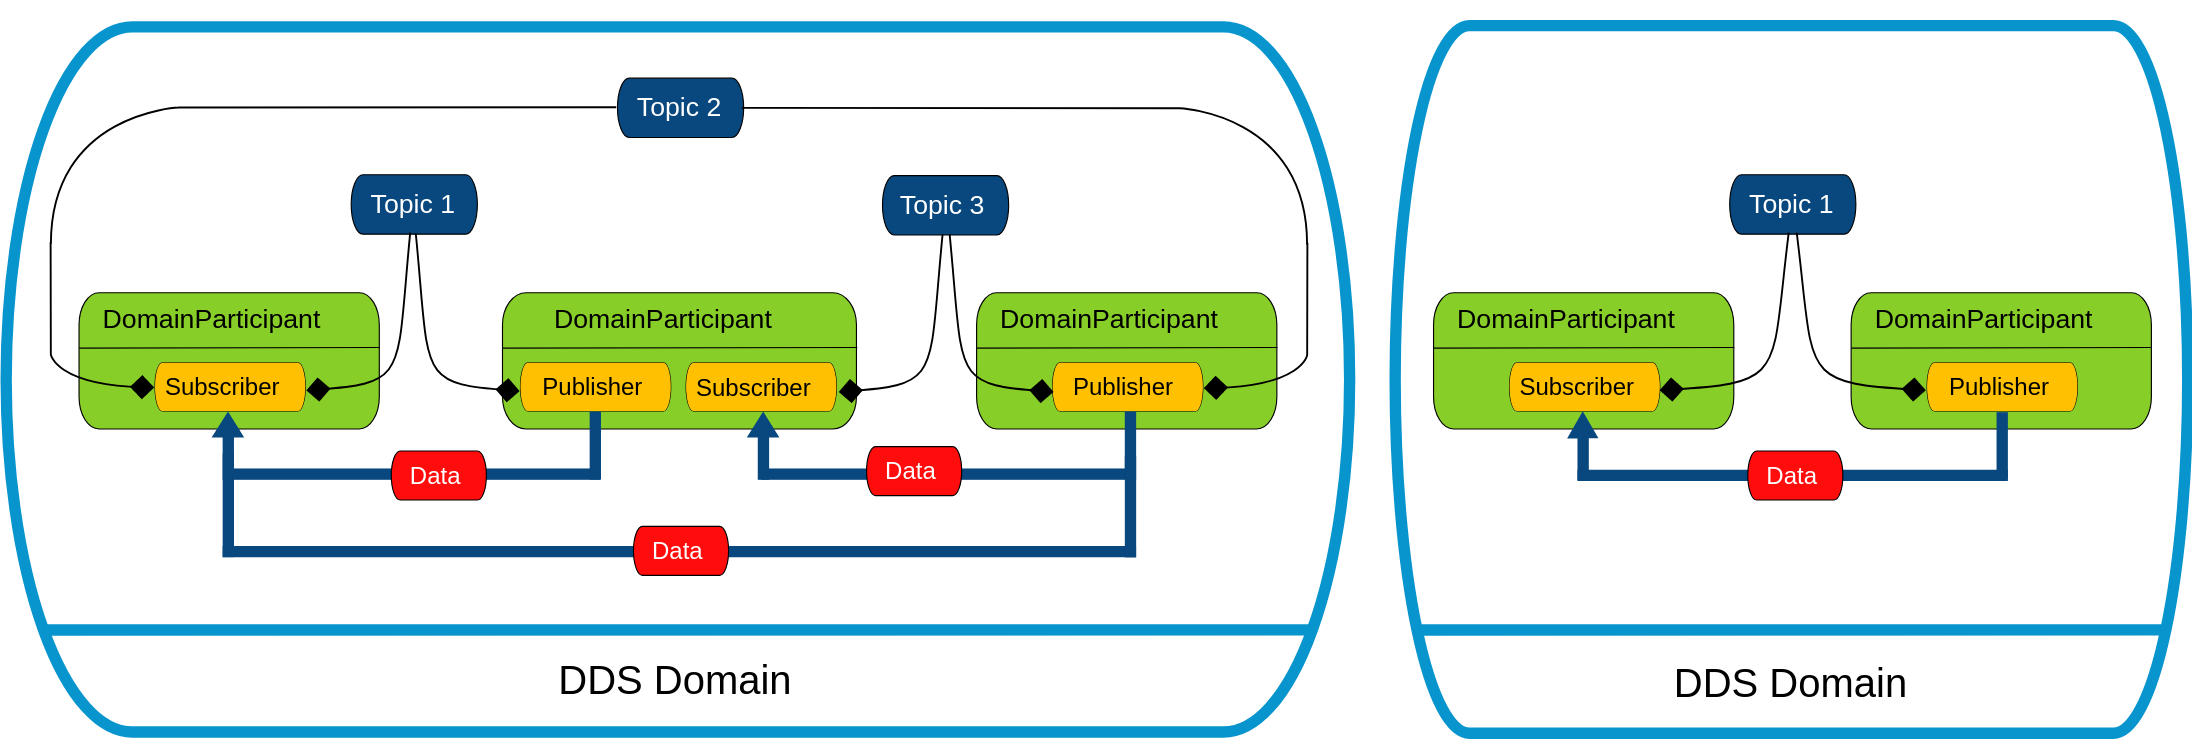
抽象出 Domain 以及 Topic 的概念,不同 Domain 之间数据独立不互通,在同一个 Domain 之间通过 Topic 发布/订阅数据;
-
-
RTPS 层(作为通道层的抽象)
-
由 OMG 联盟定义和维护,以确保不同 DDS 供应商应用程序之间可以互通;
-
基于 TCP/UDP/IP 等传输协议,提供订阅/发布通道;
-
-
通道层

DDS
Entity
-
在 DDS 中,Entity 是一个抽象基类,表示支持 Qos 策略,listener 以及 状态的实体,它有许多实现:

-
不同的 Entity 实现有不同的回调,可以从回调中看到各实体的能力:

Domain
-
一个 Domain 相当于一个独立的数据交互平台,可以看作是虚拟网络;实现多个独立的应用在同一套物理网络中共存。可以类比于 VPS(虚拟机),同一台主机上的多个 VPS 共用硬件设备,但各 VPS 之间是独立的;
-
每个 Domain 都有独立的 domainId,只有 domainId 相同的应用才能互相通信;
-
Domain 在 FastDDS 中,使用 DomainParticipant 来管理;

Partitions
- Partitions 是在 Domain 中引入的逻辑隔离,可以作用在 PublisherQos 和 SubscriberQos 上,定义了 Partitions 后,在订阅匹配上不仅要求 Topic 匹配,还要求 Partitions 匹配;
- 如果没有定义 Partitions,会自动包含在默认分区中;
- 每个 Entity(Publisher/Subscriber) 可以在多个 Partitions 中;
- Partitions 名支持通配符;看匹配示例;
Publisher
一个 Domain 可以创建多个 Publisher,每个 Publisher 可以创建多个 DataWriter,而一个 DataWriter 只能绑定一个 Topic

Topic
Topic 是作为订阅/发布模式的最基本的单位;
-
Publisher/Subscriber 于 Topic 都是一对一的关系;

-
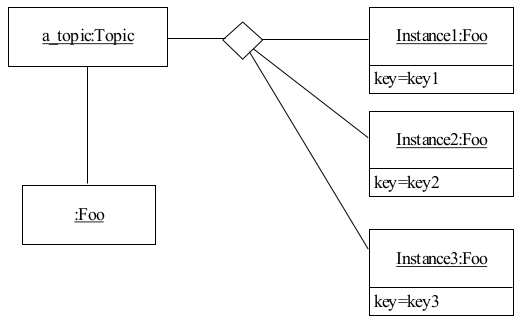
在 Topic 中,还有更细分的 Instance 概念,查看 RTI 介绍的 什么是 DDS Samples, Instances, and Keys
-
什么是 instance:
-
什么是 key:在 IDL 文件中,可以定义当前数据的 key(和数据库有点像),比如:
1
2
3
4
5
6
7
8
9
10
11
struct HelloWorld
{
    // Unique ID: airline name
    @key string<256> airline_name;
    // Unique ID: flight number
    @key short flight_number;
    // Coordinates
    double latitude;
    double longitude;
    double altitude;
};
-
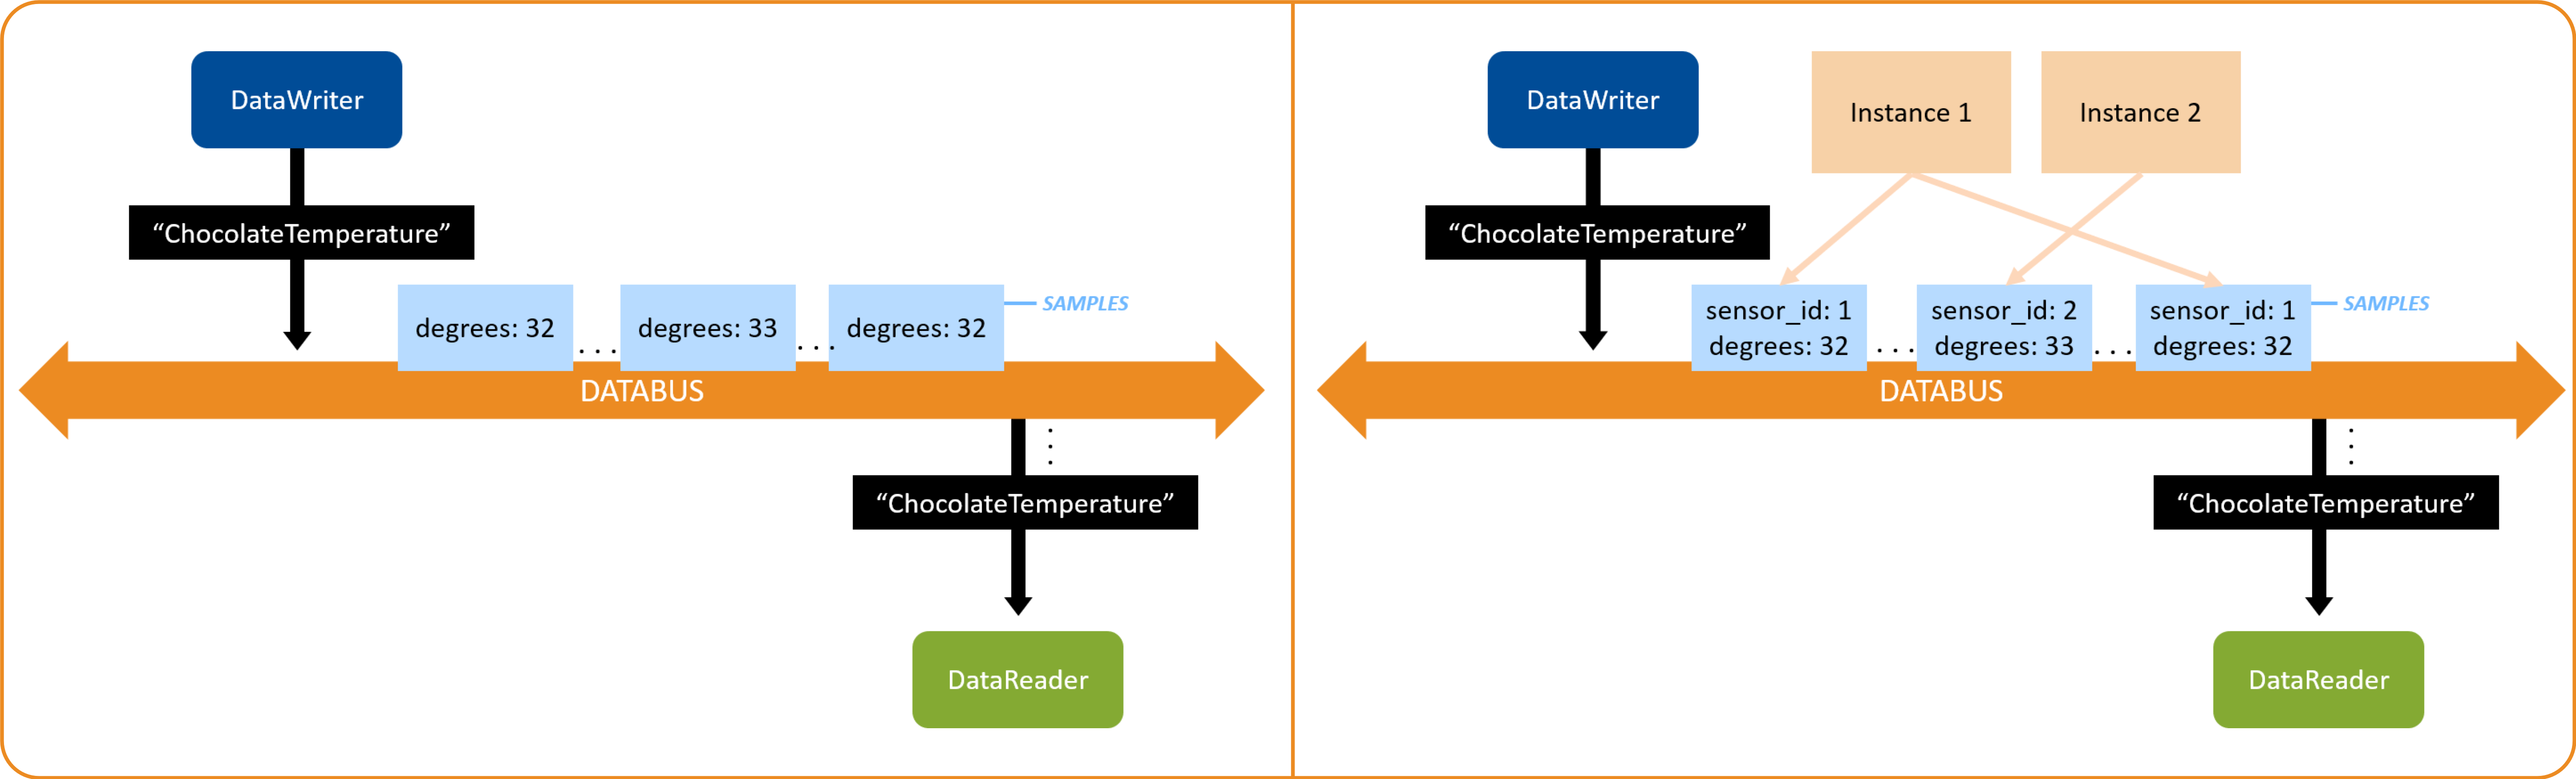
什么是sample:在 DDS 中流通的每条数据都是一个 sample;
-
instance :对定义过 key 的 sample 集合可以统一独立管理,这就是 instance;
-
-
instance 在数据流中的示例:
-
instance 的使用,查看 RTI 介绍的 Managing Data Instances;
register_instance():会返回InstanceHandle_t,用来管理 instance;unregister_instance()write()dispose()
-
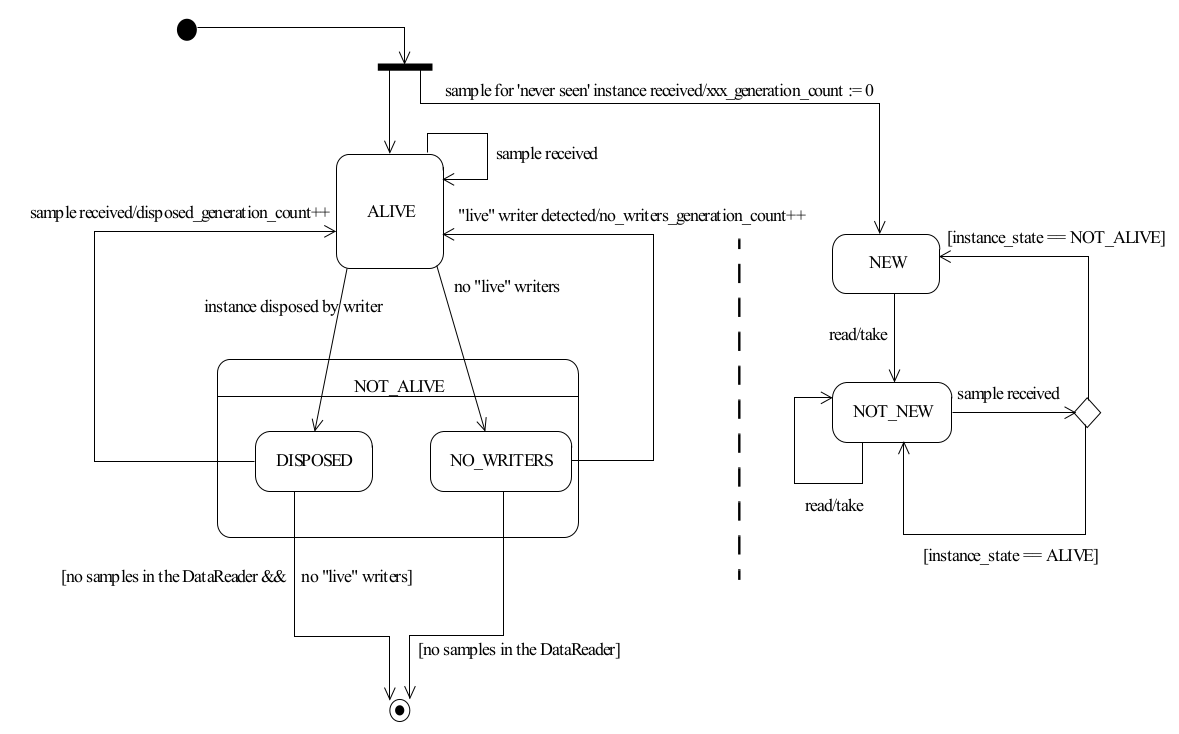
instance 生命周期:
-
为什么要用 instance:在往某个 topic 发送数据的时候,DDS 会检查该数据属于哪个 instance;指定 instance 可以提高性能,节约内存;
-
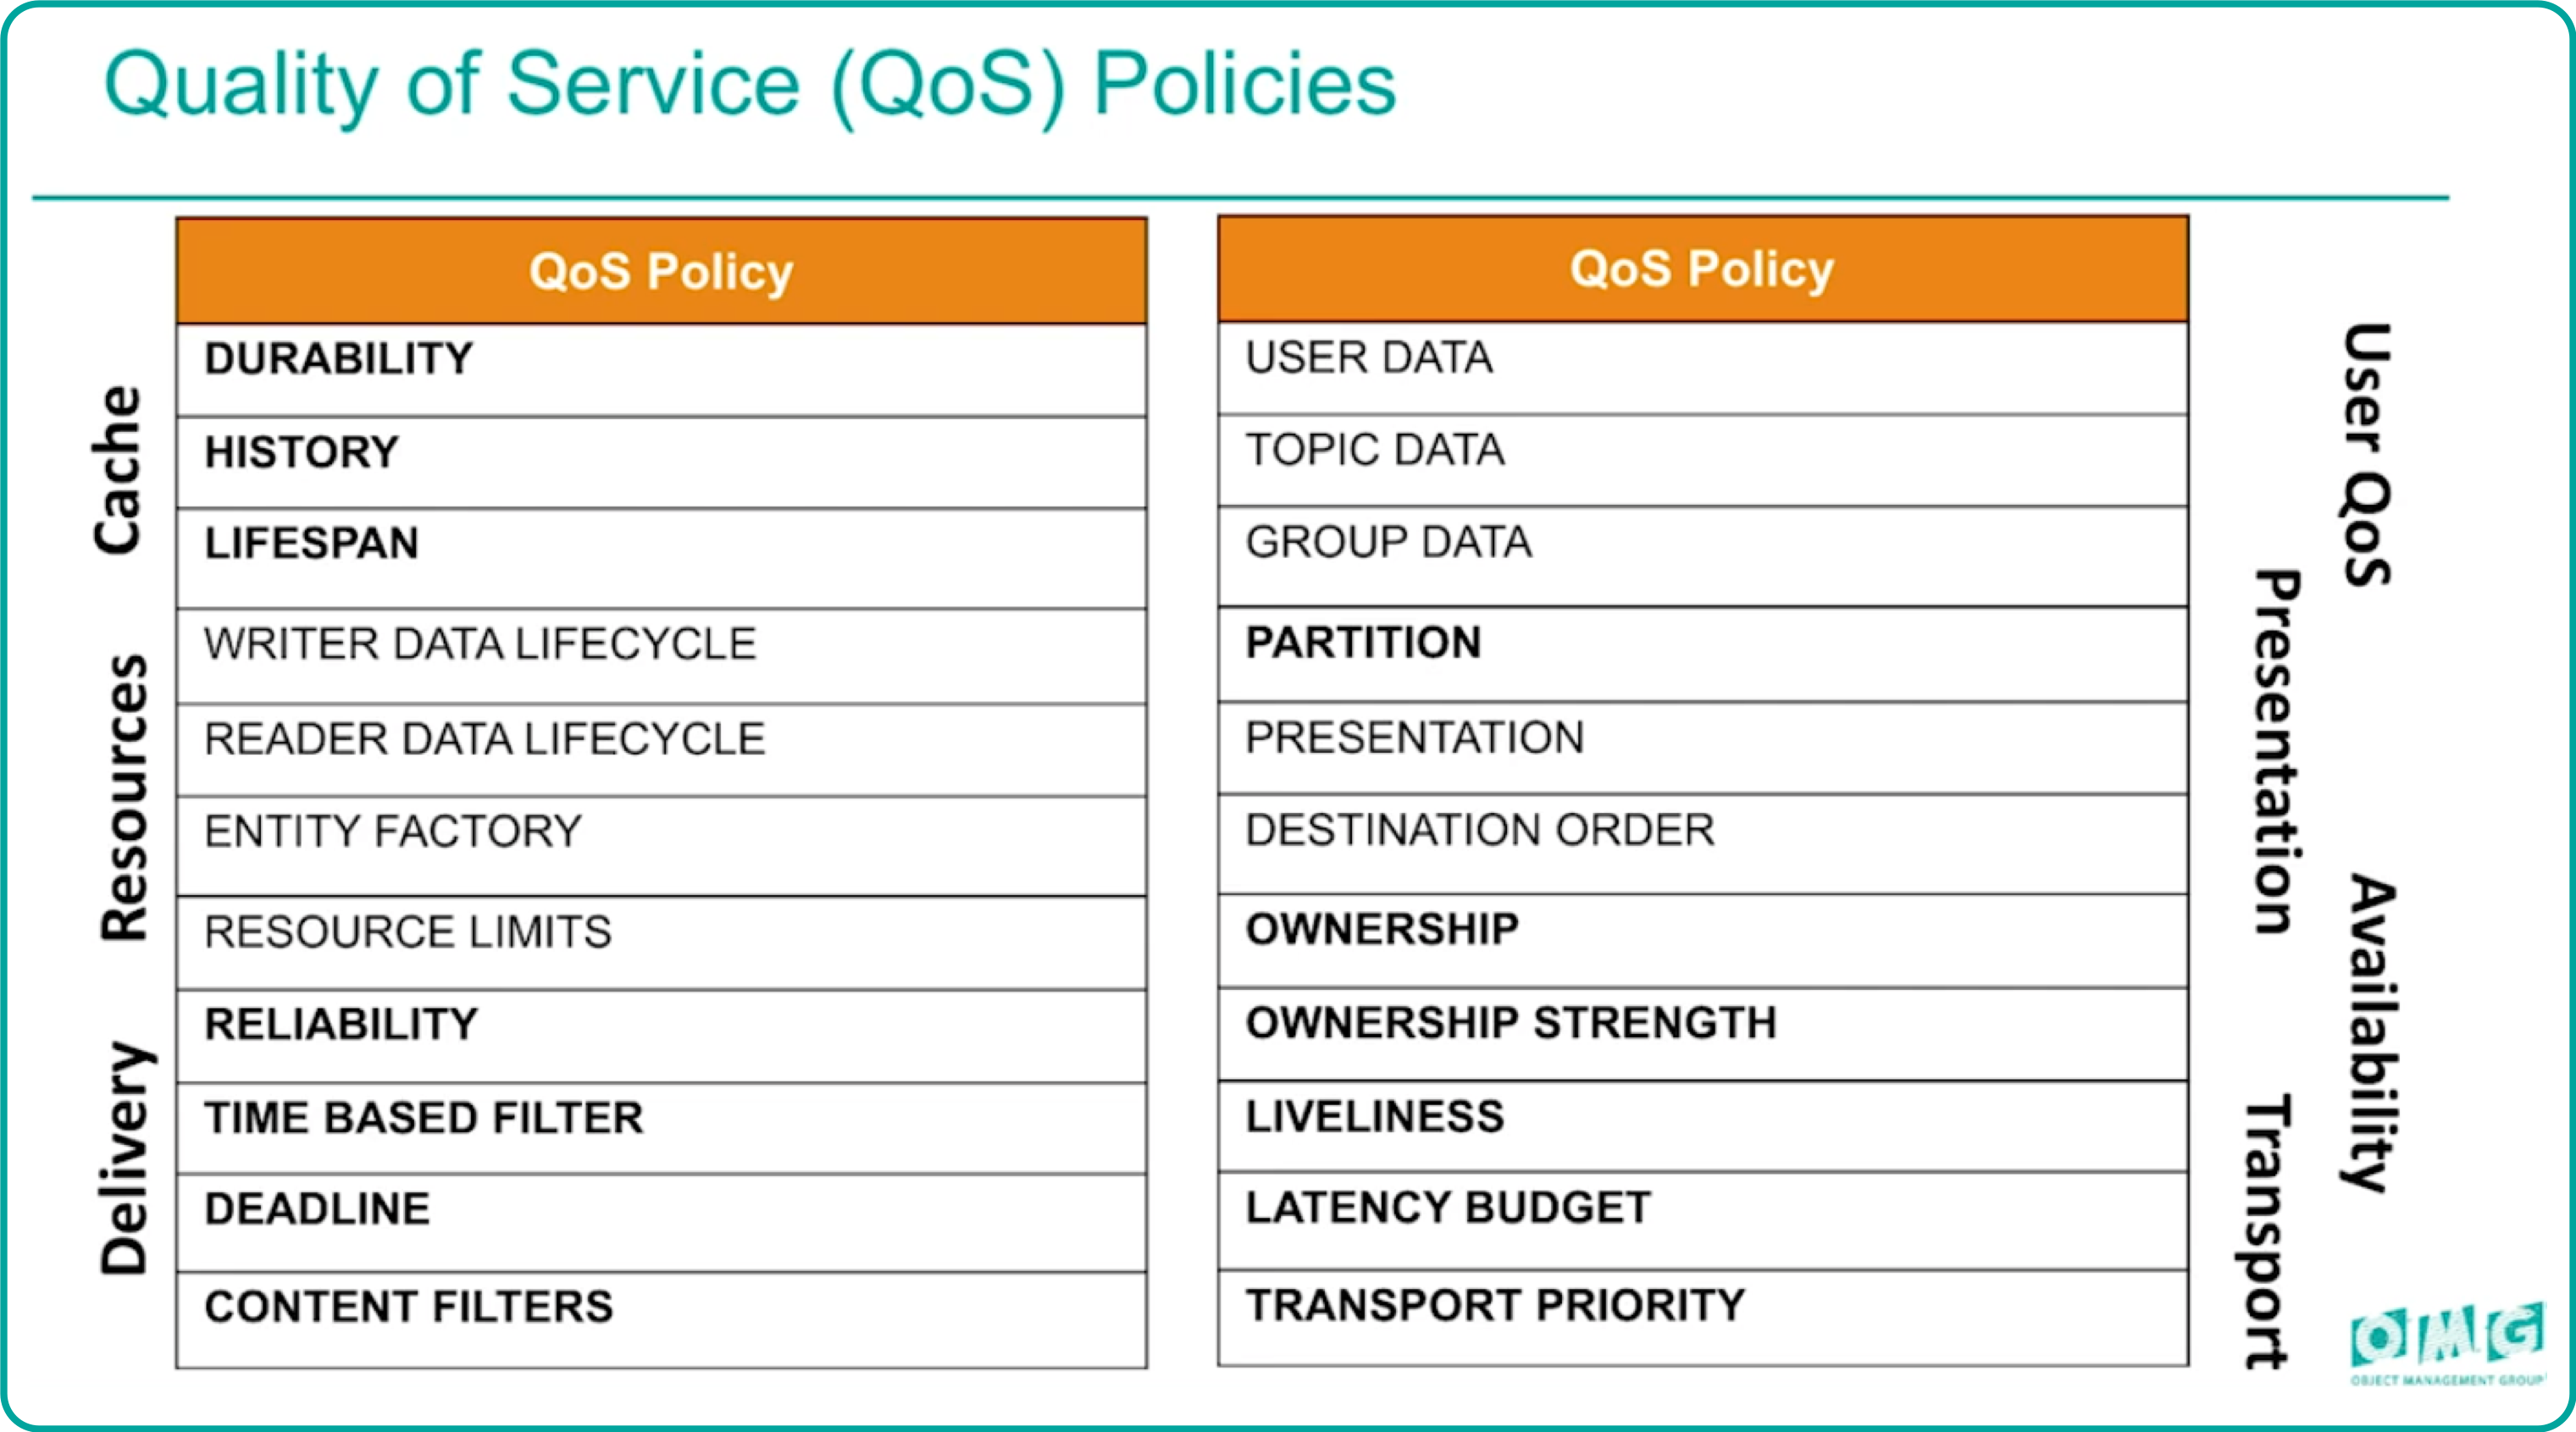
Qos
Qos 基本上负责了 DDS 的所有配置,无论是心跳,消息可靠性,流量控制,还是安全配置,甚至包括通道配置,全是通过 Qos 来实现的。
DurabilityQosPolicy
配置新加入节点对已发送数据的接受规则;
- VOLATILE_DURABILITY_QOS:不保留已发送数据;
- TRANSIENT_LOCAL_DURABILITY_QOS:保留已发送数据,当有新 DataReader 加入,会把内存中的历史数据全部发给它;
- TRANSIENT_DURABILITY_QOS:在上述基础上,持久化到本地,这样就不会丢数据了;
ReliabilityQosPolicy
配置通道的可靠性;
-
BEST_EFFORT_RELIABILITY_QOS:尽力而为,不保证数据可靠性;适合视频流等数据;
-
RELIABLE_RELIABILITY_QOS:保证可靠性;会等待 remote 的到达确认,如果数据丢失会重传;
-
max_block_time:当发送队列由于“未确认消息”而满的时候,DataWriter 的
write()操作可能会阻塞,这里设置最长阻塞时长,超时会报写入错误; -
DataWriter 和 DataReader 的 QOS 需要配对使用,如下:
DataWriter kind DataReader kind Compatibility BEST_EFFORT_RELIABILITY_QOS BEST_EFFORT_RELIABILITY_QOS Yes BEST_EFFORT_RELIABILITY_QOS RELIABLE_RELIABILITY_QOS No RELIABLE_RELIABILITY_QOS BEST_EFFORT_RELIABILITY_QOS Yes RELIABLE_RELIABILITY_QOS RELIABLE_RELIABILITY_QOS Yes
-
HistoryQosPolicy
配置已发送数据的缓存规则;
该策略行为会受到 ResourceLimitsQosPolicy 配置的影响;
-
KEEP_LAST_HISTORY_QOS:保留最新depth条数据; depth 需满足:
1
depth < ResourceLimitsQosPolicy.max_samples_per_instance
-
KEEP_ALL_HISTORY_QOS:保留所有历史数据;如果资源受限,后续行为会受 ReliabilityQosPolicy 的影响;
ResourceLimitsQosPolicy
配置终端对某个 Topic 的资源限制;
| 参数 | 说明 |
|---|---|
| max_samples | 最大 sample 数 |
| max_instances | 最大 instance 数量 |
| max_samples_per_instance | 每个 instance 可以管理的最大 sample 数 |
| allocated_samples | 初始 sample 数 |
| extra_samples | 缓存池中额外 smaple 数;因此缓存池最大数量为 max_samples + extra_sample |
LifespanQosPolicy
数据的生命周期(过期时间),默认不过期;
过期的数据 DataWriter 就不会再投递,并且从DataWriter/DataReader 的 history 中清除;
LivelinessQosPolicy
配置超时策略
- kind
- AUTOMATIC_LIVELINESS_QOS:只要连接存在,就认为存活;
- MANUAL_BY_PARTICIPANT_LIVELINESS_QOS:只要 remote DomainParticipant 响应,就认为存活;
- MANUAL_BY_TOPIC_LIVELINESS_QOS:需要 remote 对应 Topic 响应,才认为存活;
- lease_duration:超时时间,超过这个时间没有收到心跳包,则认为超时;
- announcement_period:只有 kind 为 上述 1或者2才会生效,表示发送心跳包之间的时间间隔;
DeadlineQosPolicy
指定消息的更新频率,当新消息的频率降至某个阈值以下时,会发出警报。这对于需要定期更新数据的场景很有用
DestinationOrderQosPolicy
当多个 DataWriter 对同一个 Topic 发送相同 key 消息的时候,需要定义接收端的排序方式
- BY_RECEPTION_TIMESTAMP_DESTINATIONORDER_QOS:按接收端接收时间排序,可能会导致不同终端数据因为接收顺序不一致而导致数据的不一致;
- BY_SOURCE_TIMESTAMP_DESTINATIONORDER_QOS:按发送端的发送时间戳排序,可以保证多终端数据的一致性;
OwnershipQosPolicy
对某个 Instance 配置是否允许多端同时下发;
- SHARED_OWNERSHIP_QOS:允许多终端同时下发;
- EXCLUSIVE_OWNERSHIP_QOS:不允许多终端同时下发,在某个时间点,只允许一个终端下发数据;而允许下发的终端是可动态变化的;
PartitionQosPolicy
Partitions 是在 Domain 中引入的逻辑隔离;可以作用在 PublisherQos 和 SubscriberQos 上;
1
2
3
4
5
6
7
8
9
10
11
12
PartitionQosPolicy partitions;
//The PartitionsQosPolicy is default constructed with max_size = 0.
//Max_size is a private member so you need to use getters and setters to access
//Change the max_size to 20
partitions.set_max_size(20); //Setter function
//The PartitionsQosPolicy is default constructed with an empty list of partitions
//Partitions is a private member so you need to use getters and setters to access
//Add new partitions
std::vector<std::string> part = partitions.names();
part.push_back("part1");
part.push_back("part2");
partitions.names(part); //Setter function
FlowControllersQos
流量控制
-
scheduler:
- FIFO:先 write,先发送;
- ROUND_ROBIN:循环所有 DataWriter,每次只发一条 sample;
- HIGH_PRIORITY:根据优先级,高优先级优先发送;
- PRIORITY_WITH_RESERVATION:在上述 HIGH_PRIORITY 的基础上,预留一定的带宽资源给当前 DataWritter 使用;
-
max_bytes_per_period:单位 period_ms 时间内,最大能发送的数据量(bytes);
-
period_ms:时长,单位 milliseconds;
-
Example:
1
2
3
4
5
6
7
8
9
10
11
12
13
14
15
16
17
18
19
// Limit to 300kb per second.
static const char* flow_controller_name = "example_flow_controller";
auto flow_control_300k_per_sec = std::make_shared<eprosima::fastdds::rtps::FlowControllerDescriptor>();
flow_control_300k_per_sec->name = flow_controller_name;
flow_control_300k_per_sec->scheduler = eprosima::fastdds::rtps::FlowControllerSchedulerPolicy::FIFO;
flow_control_300k_per_sec->max_bytes_per_period = 300 * 1000;
flow_control_300k_per_sec->period_ms = 1000;

// Register flow controller on participant
DomainParticipantQos participant_qos;
participant_qos.flow_controllers().push_back(flow_control_300k_per_sec);

// .... create participant and publisher

// Link writer to the registered flow controller.
// Note that ASYNCHRONOUS_PUBLISH_MODE must be used
DataWriterQos qos;
qos.publish_mode().kind = ASYNCHRONOUS_PUBLISH_MODE;
qos.publish_mode().flow_controller_name = flow_controller_name;
PublishModeQosPolicy
- SYNCHRONOUS_PUBLISH_MODE:同步发送数据;
- ASYNCHRONOUS_PUBLISH_MODE:异步发送数据;
发现协议
发现机制
| 发现机制 | 简介 |
|---|---|
| Simple Discovery (默认) | 分为 SPDP、SEDP 两个阶段 |
| Discovery Server | 集中式发现体系结构 |
| Static Discovery | 使用 SPDP,而 EDP 需要手工(XML)配置 |
| Manual Discovery | 位于 RTPS 层,全手动配置 |
Discovery Server 和 Simple Discovery 的比较:

发现步骤(SIMPLE)
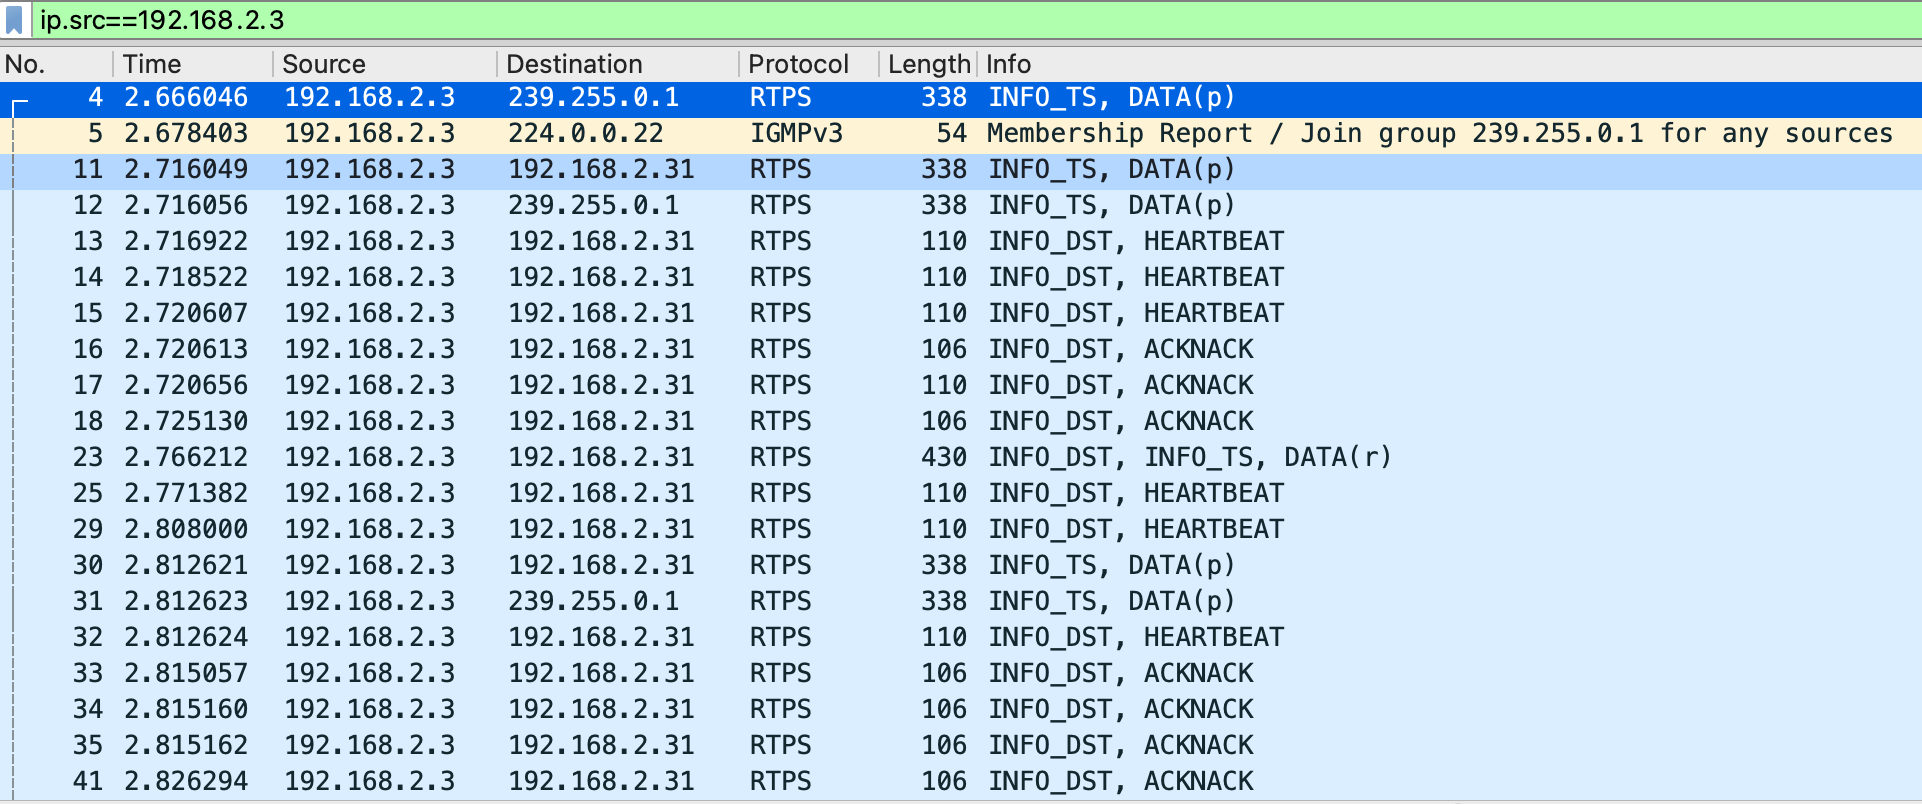
-
向指定的多播地址(默认 239.255.0.1)发送本机 DomainParticipants 信息,主要包含下图中的 DomainId,单播地址等;
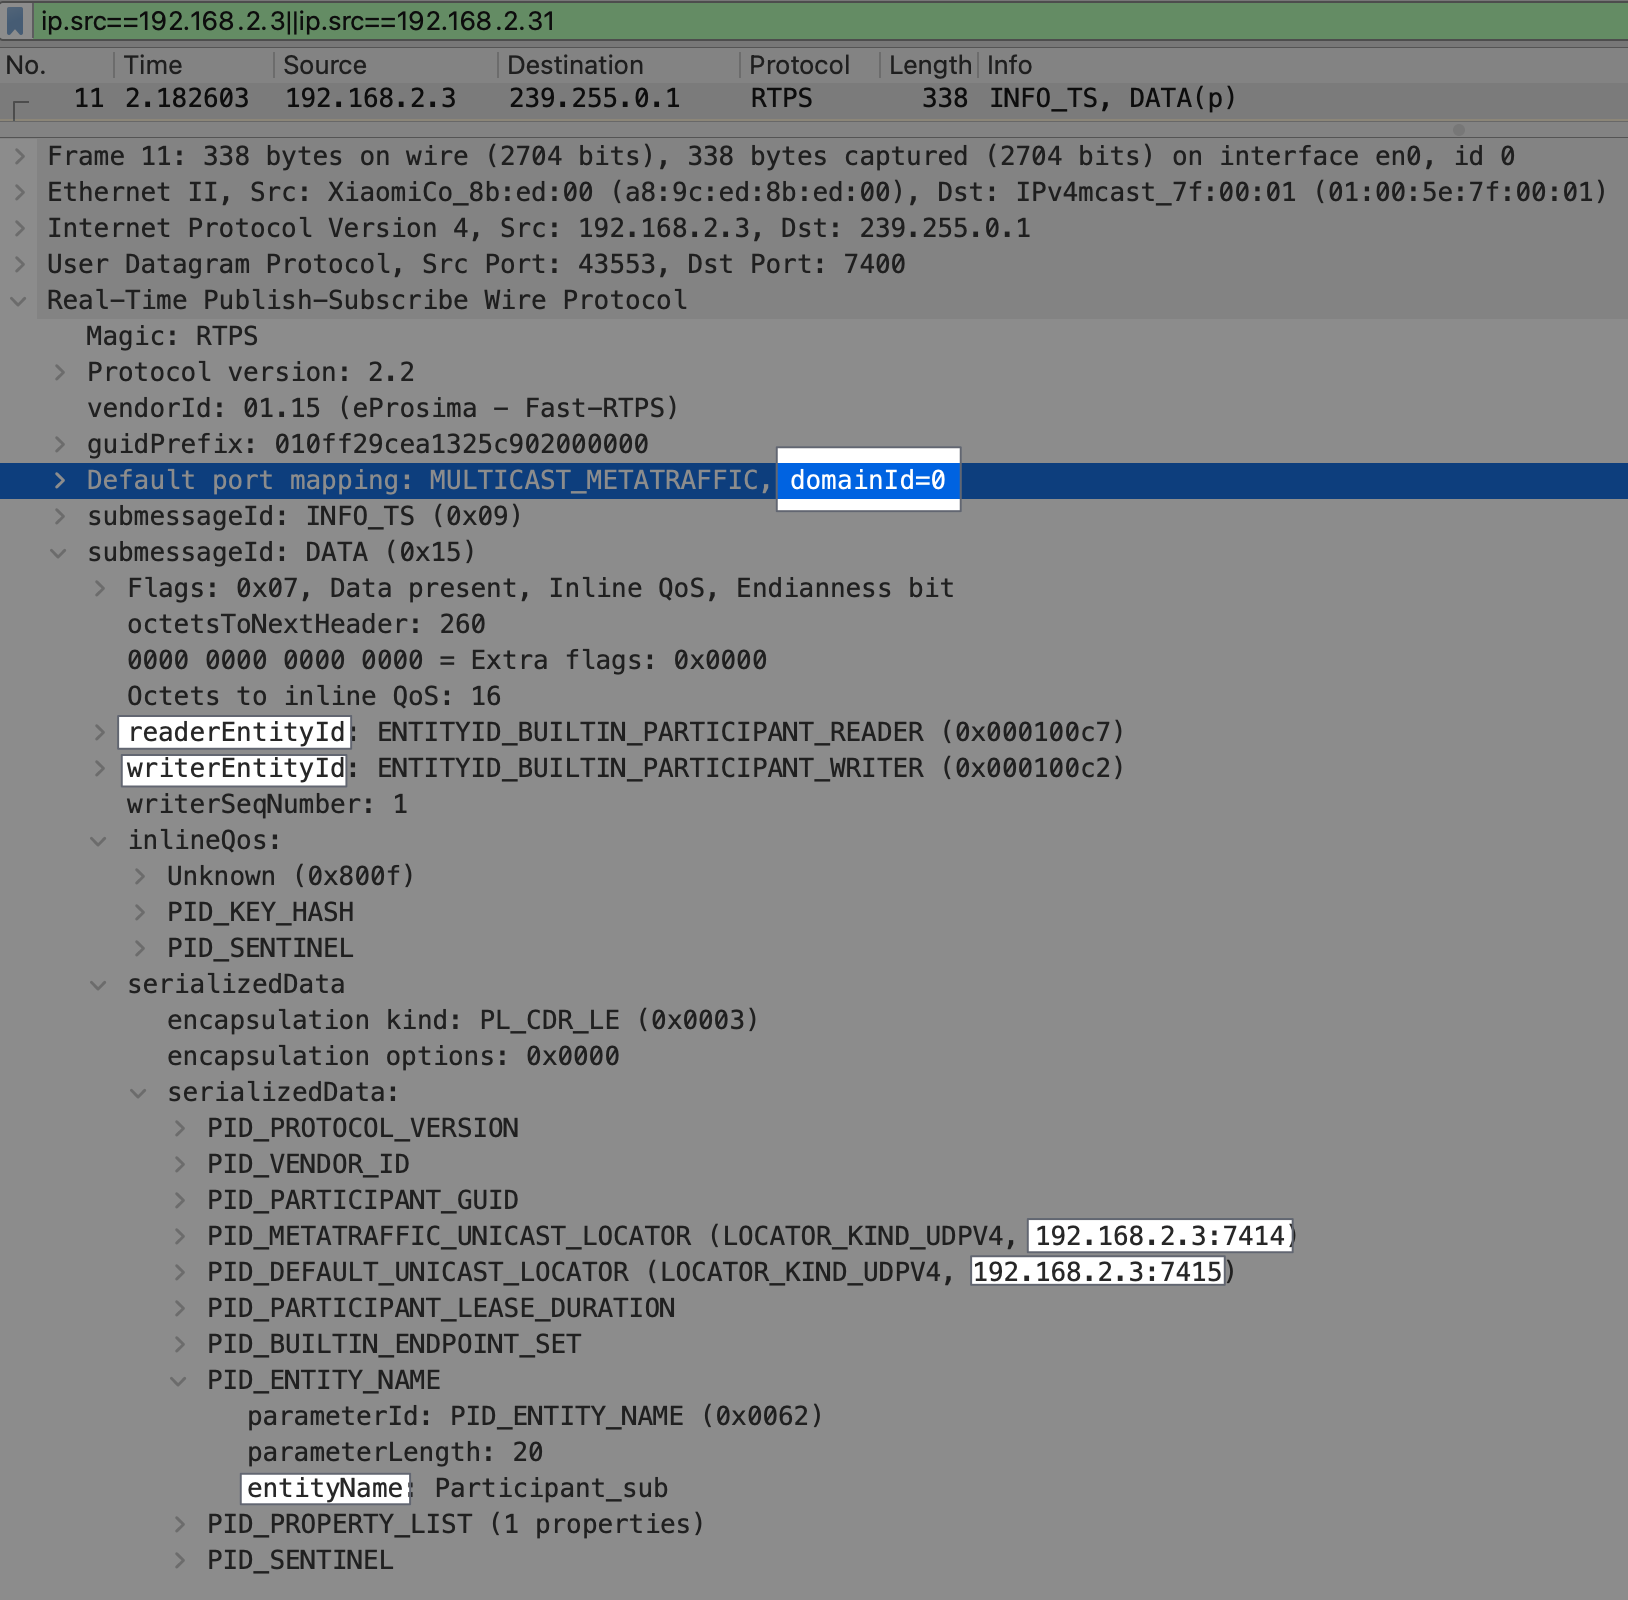
这个信息会循环发送
- 在 DomainParticipants 创建期间,默认以 100ms 间隔持续发送,可以通过
discovery_config.initial_announcements.period设置; - Participants 创建完毕后,默认会以 3秒 的间隔持续发送;可通过
discovery_config.leaseDuration_announcementperiod设置;
- 在 DomainParticipants 创建期间,默认以 100ms 间隔持续发送,可以通过
-
加入多播组(239.255.0.1),以接受多播消息;
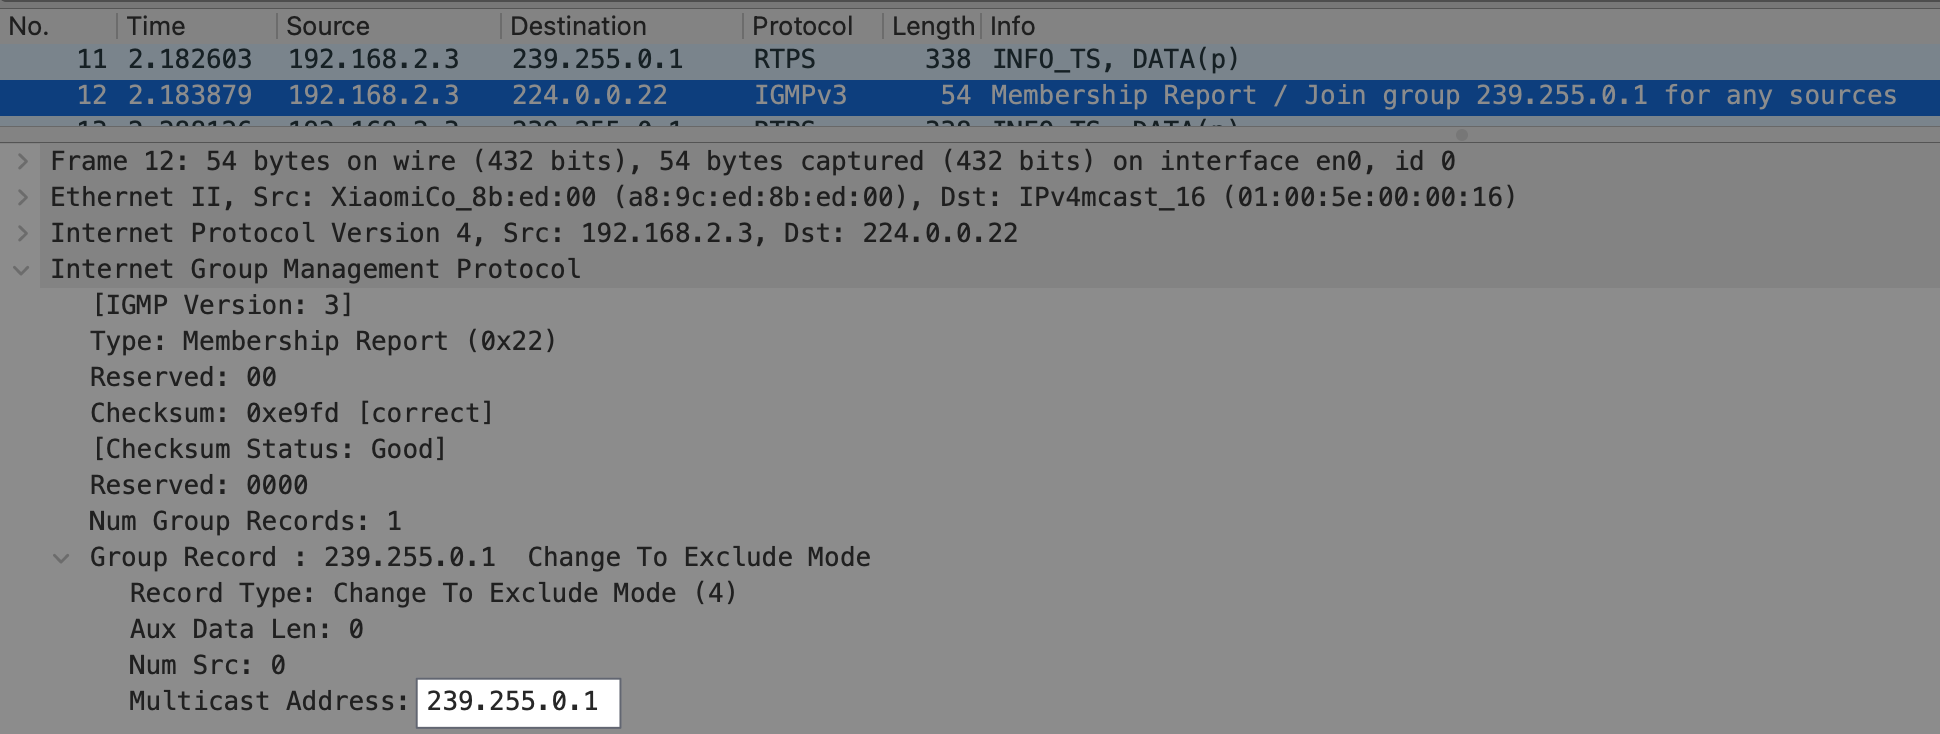
-
按照 RTPS 标准,每个 Participant 需要监听 2个端口;当然,端口号可以并存预设,以及计算规则的修改;
- 单播端口:
unicast_port = 7400 + 250 * domainID + 10 + 2 * participantID; - 多播端口:
multicast_port = 7400 + 250 * domainId + 0
这里设计巧妙的一点,不同 domainID 使用的多播端口号是不同的,所以不同 domain 之间数据是隔离的(不会互相发现);而且相同 domain 不同终端之间计算出来的多播端口号是一致的,所以可以直接找到对方而不用过滤;
- 单播端口:
-
总体Simple Discovery机制的发现步骤如下,其中多播并不是必要的,如果初始化的时候可以内置单播地址以及端口,就可以禁用多播通道;
超时
默认 20 秒,可以通过discovery_config.leaseDuration 配置;
通道层
默认通道
FastDDS 默认开启 UDP & SHM 通道,可以设置 use_builtin_transports = false关闭;
UDP 通道
1
2
3
4
5
6
7
8
9
10
11
12
13
DomainParticipantQos qos;

// Create a descriptor for the new transport.
auto udp_transport = std::make_shared<UDPv4TransportDescriptor>();
udp_transport->sendBufferSize = 9216;
udp_transport->receiveBufferSize = 9216;
udp_transport->non_blocking_send = true;

// Link the Transport Layer to the Participant.
qos.transport().user_transports.push_back(udp_transport);

// Avoid using the default transport
qos.transport().use_builtin_transports = false;
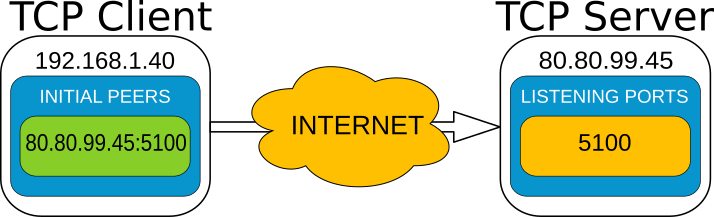
TCP 通道
TCP 通道可以实现广域网中 DDS 的使用,区分客户端以及服务端,不同的端需要不同配置;
-
服务端配置
1
2
3
4
5
6
7
8
9
10
11
12
13
14
DomainParticipantQos qos;

// Create a descriptor for the new transport.
auto tcp_transport = std::make_shared<TCPv4TransportDescriptor>();
tcp_transport->sendBufferSize = 9216;
tcp_transport->receiveBufferSize = 9216;
tcp_transport->add_listener_port(5100);
tcp_transport->set_WAN_address("80.80.99.45");

// Link the Transport Layer to the Participant.
qos.transport().user_transports.push_back(tcp_transport);

// Avoid using the default transport
qos.transport().use_builtin_transports = false;
-
客户端配置:
1
2
3
4
5
6
7
8
9
10
11
12
13
14
15
16
17
18
19
20
DomainParticipantQos qos;

// Disable the built-in Transport Layer.
qos.transport().use_builtin_transports = false;

// Create a descriptor for the new transport.
// Do not configure any listener port
auto tcp_transport = std::make_shared<TCPv4TransportDescriptor>();
qos.transport().user_transports.push_back(tcp_transport);

// Set initial peers.
Locator_t initial_peer_locator;
initial_peer_locator.kind = LOCATOR_KIND_TCPv4;
IPLocator::setIPv4(initial_peer_locator, "80.80.99.45");
initial_peer_locator.port = 5100;

qos.wire_protocol().builtin.initialPeersList.push_back(initial_peer_locator);

// Avoid using the default transport
qos.transport().use_builtin_transports = false;
-
经过测试,在同一个 Domain 中开启 TCP 以及 UDP 通道,只会有一个通道生效(前一个),这2个并不能共存;所以如果需要通过云端将多个局域网连接在一起,需要使用独立的 TCP Domain 作为隧道打通局域网;
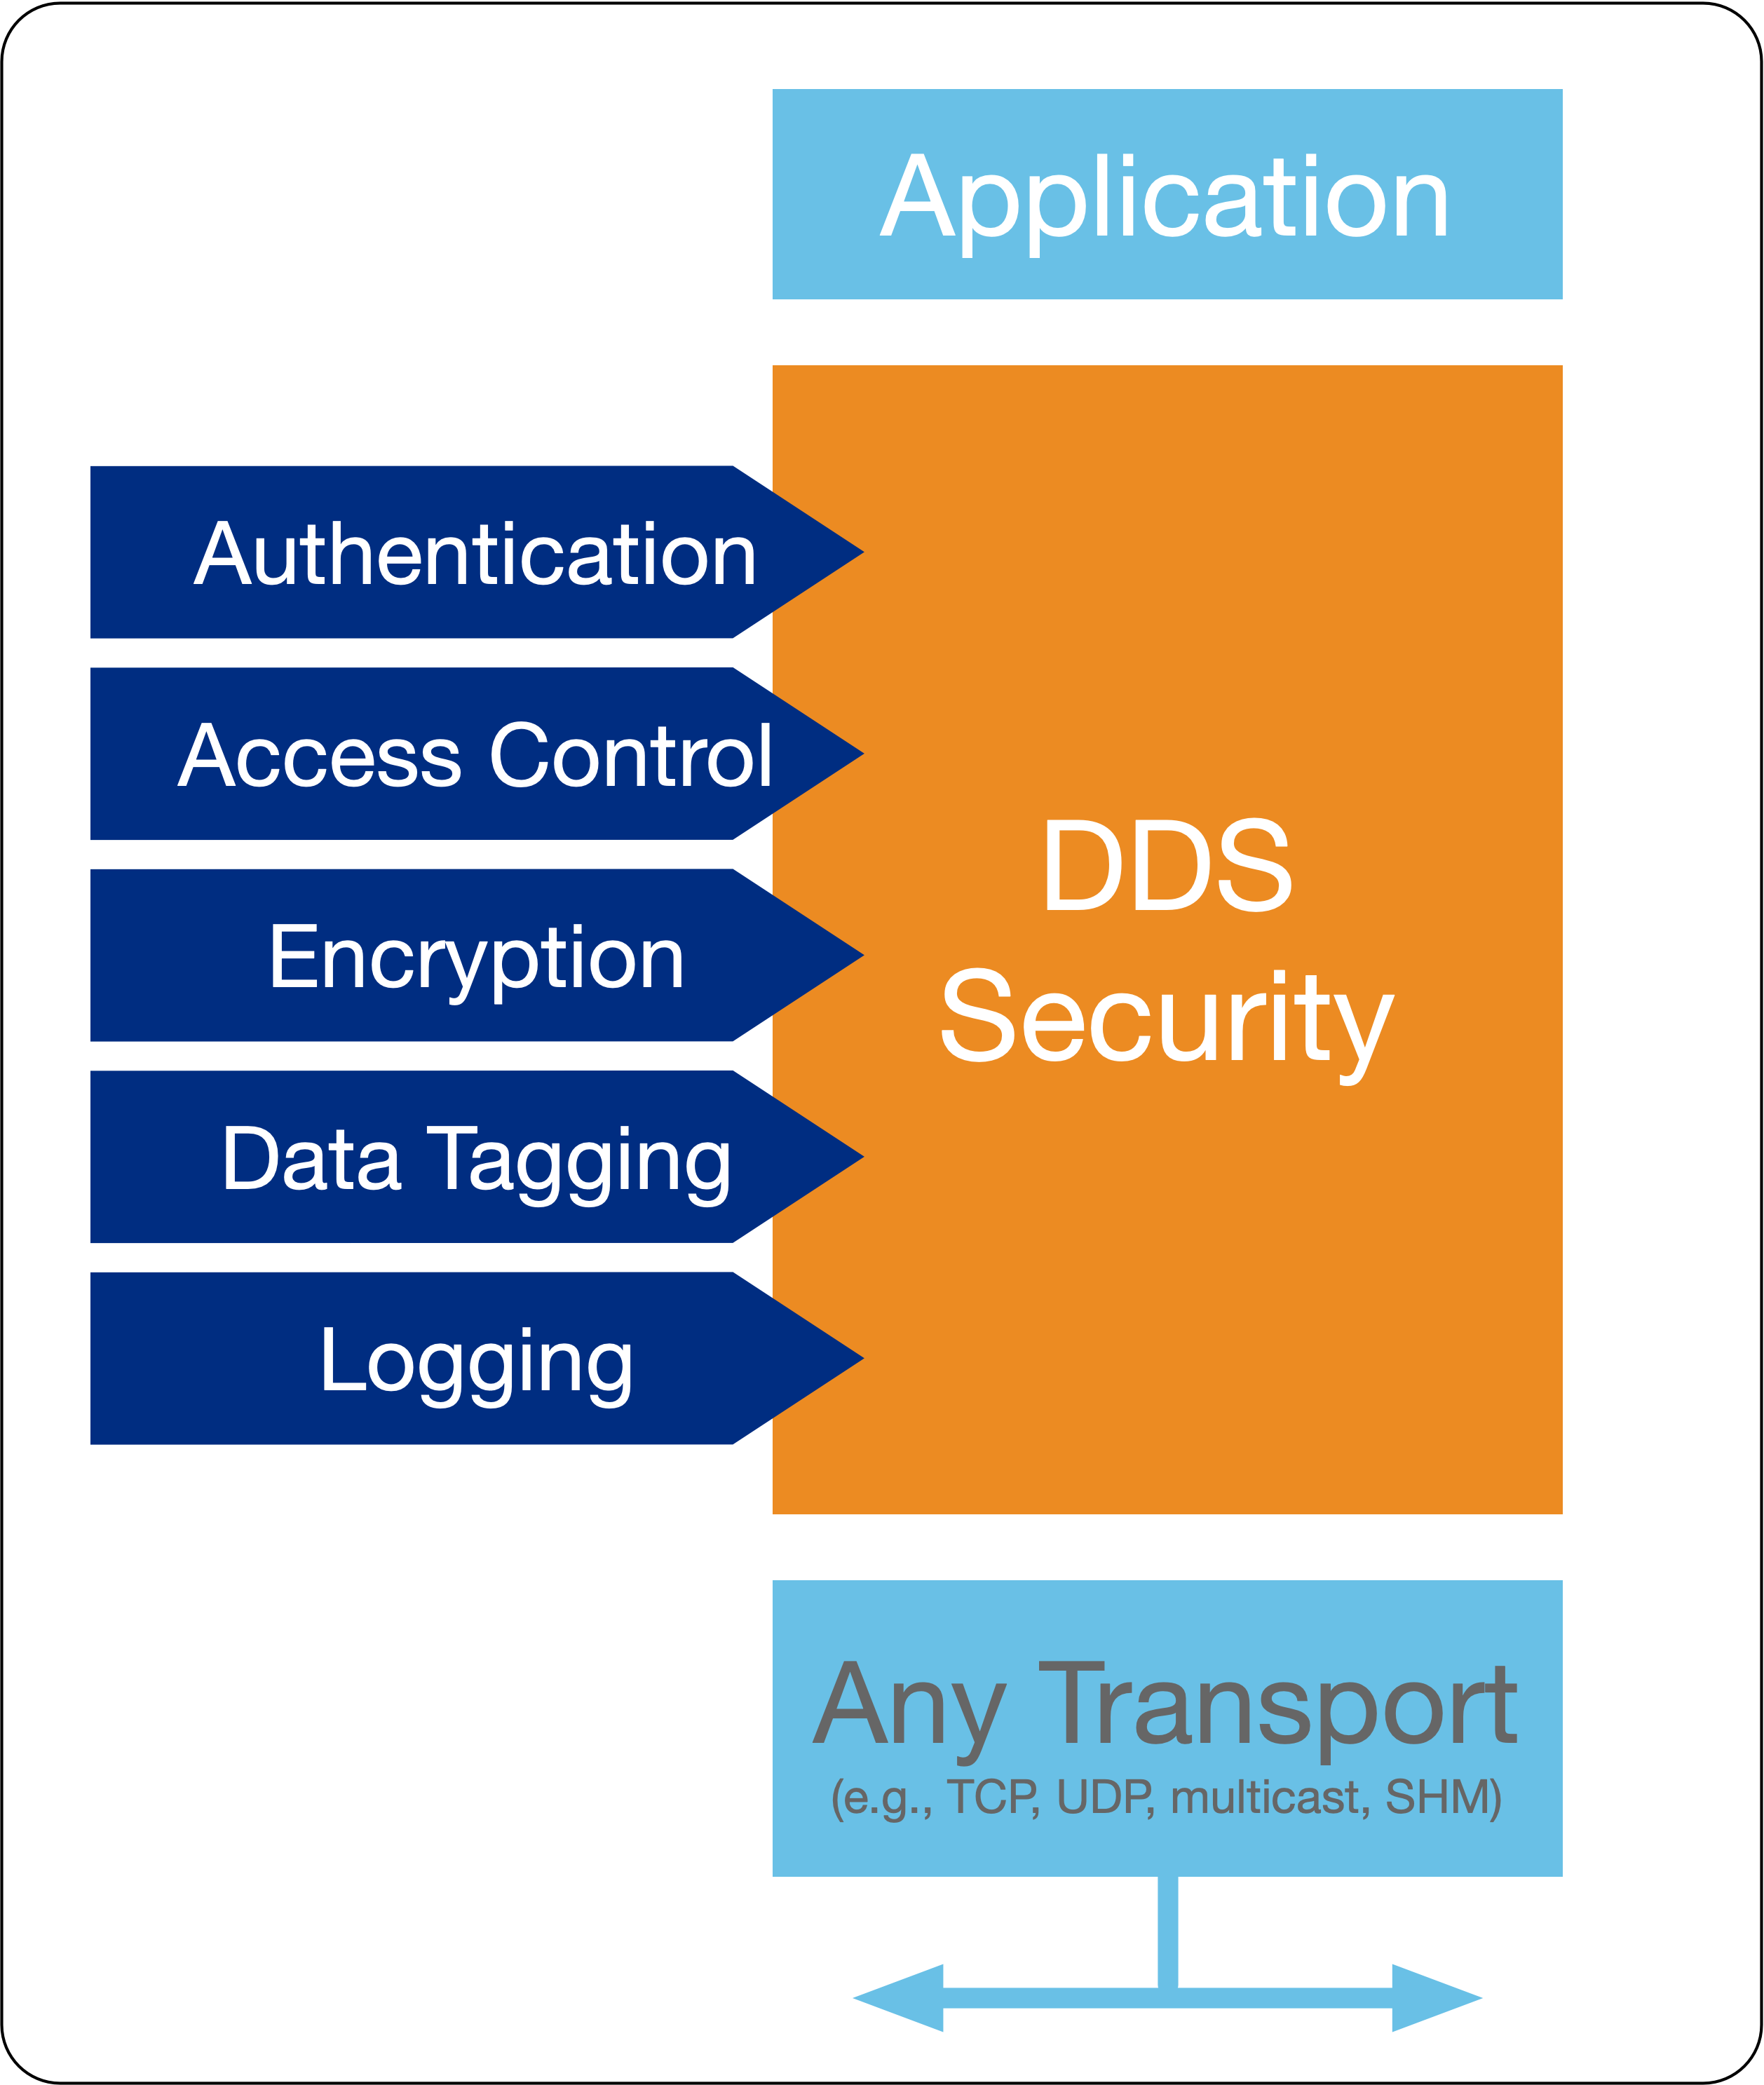
安全
FastDDS 提供5个安全构建时插件,分别是 身份鉴定,访问控制,数据加密,日志,数据标签;
身份鉴定
-
需要用到的几个证书
证书配置 说明 identity_ca DDS 使用的根证书,所有 DDS 客户端共用一份;本证书私钥需要管理员自行保存; identity_certificate DomainParticipant 使用的证书,需要被 identity_ca(根证书)签名,各终端互相独立; identity_crl (可选) 过期的证书列表 private_key DomainParticipant 证书私钥,对应上述identity_certificate证书;需要配置到终端中; password (可选) 私钥密码,可以将上述 private_key 加密,这里传入密码; -
初始化证书
-
根证书(identity_ca):可以内置,或者在终端首次运行时从服务端获取;用来在发现期间验证其他 DomainParticipant 证书合法性;
-
DomainParticipant 证书(identity_certificate):在终端首次运行时自动生成,本地保存好私钥;然后将生成的证书上传服务器请求签名,服务器使用根证书签名后返回;后续 DomainParticipant 就可以使用这个证书进行发现服务的身份鉴定;
sequenceDiagram participant C as Client participant S as 证书服务器 C->>C: 首次运行,生成“私钥A”及“CA证书A”(identity_certificate) Note over C: 将“私钥A”储存
于安全区域 C->>S: 将“CA证书A”上传至证书服务器 S->>S: 使用根证书私钥签名“CA证书A”,得到“CA证书B” S->>C: 返回“CA证书B” C->>C: 保存“CA证书B”(没有安全要求)
-
-
身份鉴定
-
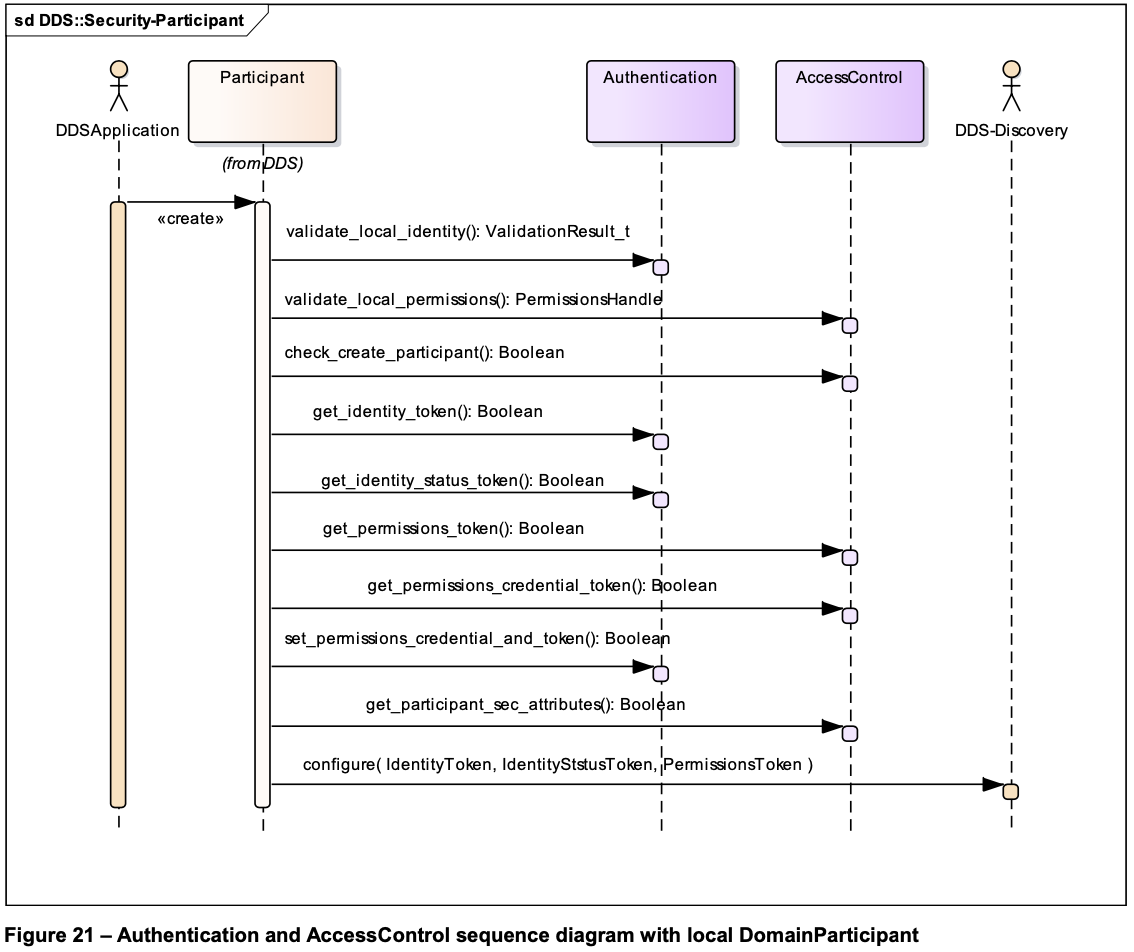
DomainParticipant 初始化:
- 在调用
create_participant方法创建 DomainParticipant 的时候,会进入自检流程,自检完成会生成IdentityToken,PermissionsToken等,然后交给发现服务使用; validate_local_identity()(#70,#192):- 使用根证书,验证本地 DomainParticipant 的identity_certificate证书合法性;
- 该方法需要返回当前 participant 的句柄
IdentityHandle,以及在 DDS 网络中唯一的身份标识GUID_t;
- 在调用
-
进入握手环节:

-
validate_remote_identity()(#193):-
验证
remote_identity_token和local_identity_token是否一致; -
比较
participant_guid1 2 3 4
if (remote_participant_guid > local_participant_guid) return VALIDATION_PENDING_HANDSHAKE_REQUEST; // 下一步:begin_handshake_request else return VALIDATION_PENDING_HANDSHAKE_MESSAGE; // 下一步:等待
-
-
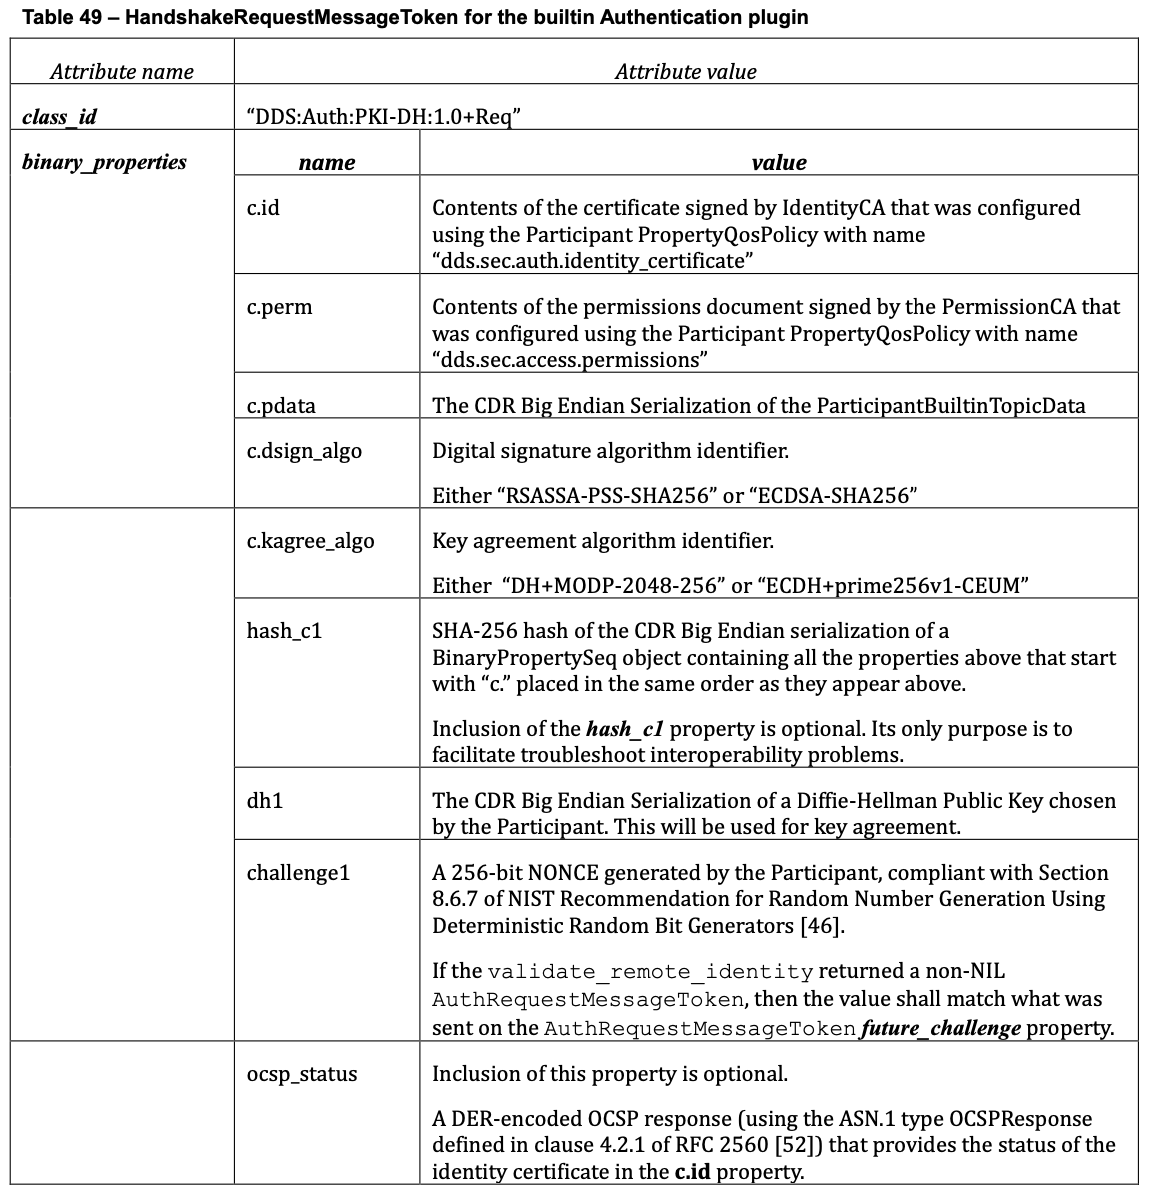
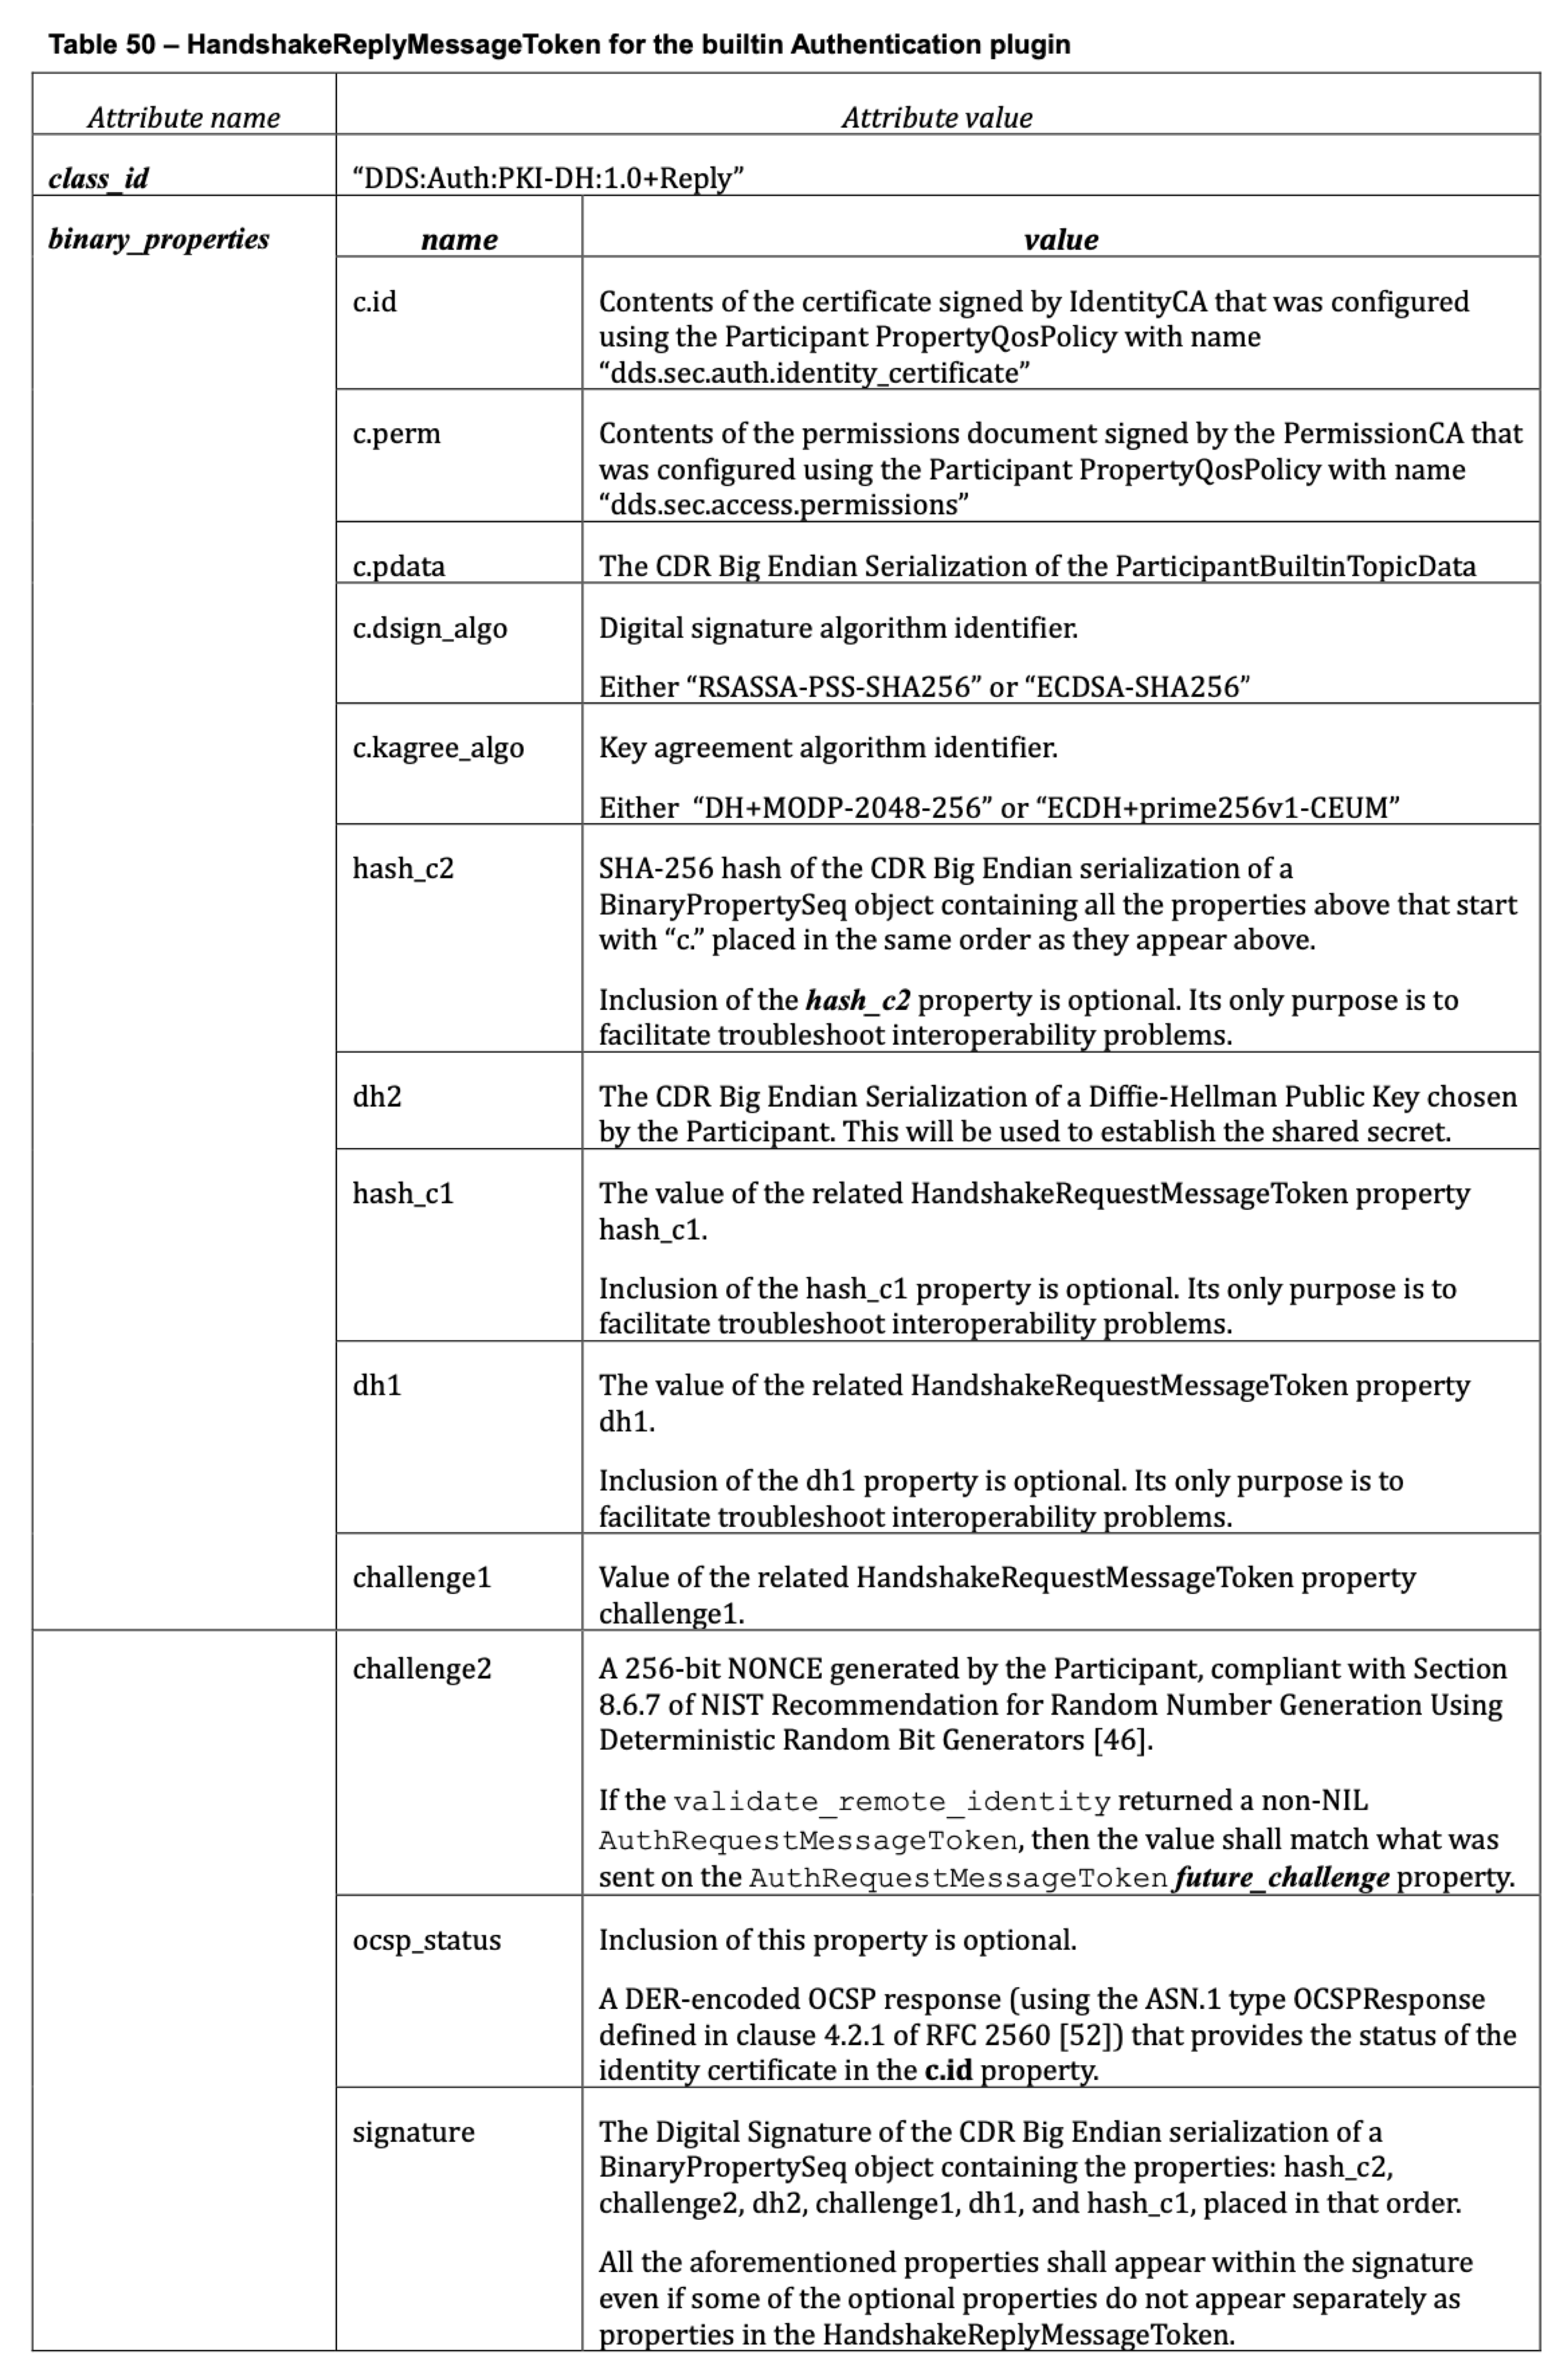
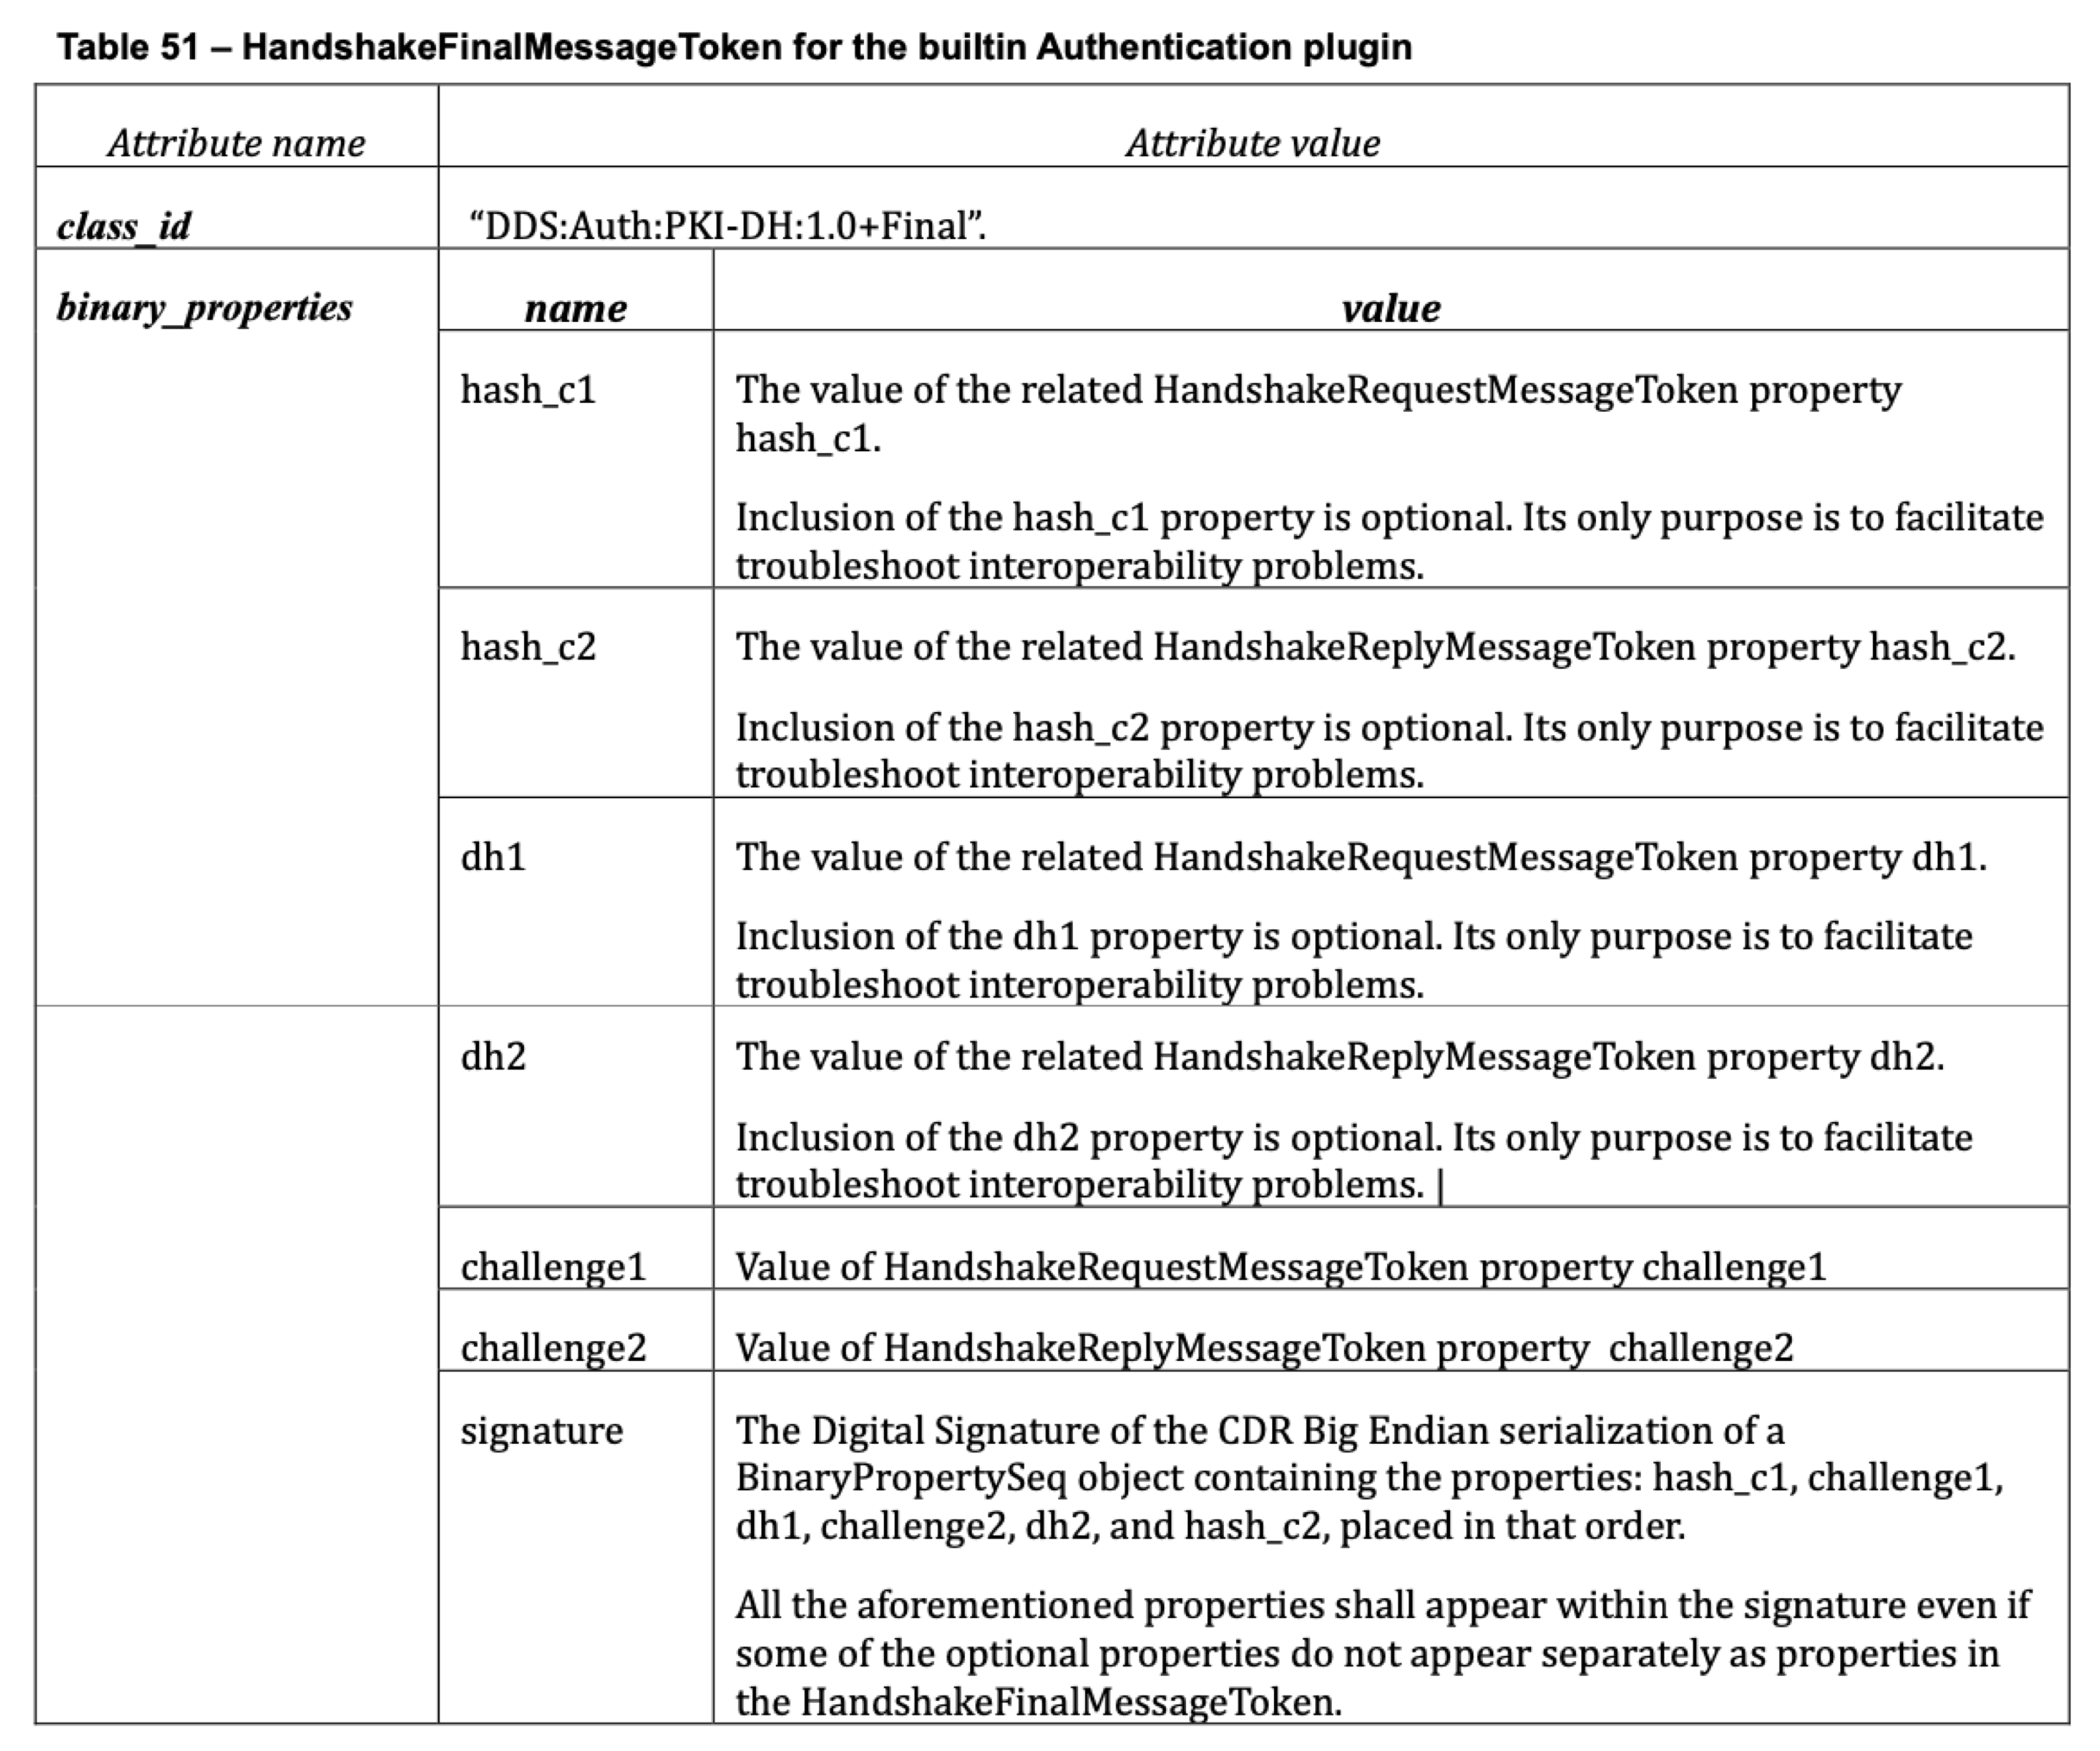
HandShakeMessageToken有3种格式(#187): -
begin_handshake_reply(#194):- 使用根证书验证 remote 证书
HandShakeRequestMessageToken.c.id; - 生成 dh1 = DH publicKey,生成随机数保留本地,然后将 dh1 发给 remote;
- 使用根证书验证 remote 证书
-
begin_handshake_request.process_handshake:- 使用根证书验证 remote 证书;
- 生成随机数保留本地,计算 dh2 发给 remote;
- 使用本地随机数,以及 dh1 生成共享对称密钥;
-
begin_handshake_replay.process_handshake: 使用本地随机数,以及 dh2 生成共享对称密钥; -
get_shared_secret():获得协商后的对称加密密钥;
-
-
-
终端配置
1
2
3
4
5
6
7
8
9
10
11
12
13
14
15
16
DomainParticipantQos pqos;
// 启用“身份鉴定”插件:
pqos.properties().properties().emplace_back("dds.sec.auth.plugin",
        "builtin.PKI-DH");
// 配置根证书:
pqos.properties().properties().emplace_back(
    "dds.sec.auth.builtin.PKI-DH.identity_ca",
    "file://identity_ca.pem");
// 配置终端证书:
pqos.properties().properties().emplace_back(
    "dds.sec.auth.builtin.PKI-DH.identity_certificate",
    "file://identity_certificate.pem");
// 终端证书私钥:
pqos.properties().properties().emplace_back(
    "dds.sec.auth.builtin.PKI-DH.private_key",
    "file://private_key.pem");
访问控制
-
需要用到的几个文件
配置 说明 permissions_ca 权限根证书(可以共用上面的identity_ca),下面2个文件都需要被此证书加签 governance 配置数据加密方式,加密等级等 permissions 访问权限配置 -
配置数据在 DDS 中的加密方式,加密等级,加密范围;
1
2
3
4
5
6
7
8
9
10
11
12
13
14
15
16
17
18
19
20
21
22
23
24
25
26
27
28
29
<dds xmlns:xsi="http://www.w3.org/2001/XMLSchema-instance"
 2    xsi:noNamespaceSchemaLocation="omg_shared_ca_domain_governance.xsd">
 3    <domain_access_rules>
 4        <domain_rule>
 5            <domains>
 6                <id_range>
 7                    <min>0</min>
 8                    <max>230</max>
 9                </id_range>
10            </domains>
11            <allow_unauthenticated_participants>false</allow_unauthenticated_participants>
12            <enable_join_access_control>true</enable_join_access_control>
13            <discovery_protection_kind>ENCRYPT</discovery_protection_kind>
14            <liveliness_protection_kind>ENCRYPT</liveliness_protection_kind>
15            <rtps_protection_kind>ENCRYPT</rtps_protection_kind>
16            <topic_access_rules>
17                <topic_rule>
18                    <topic_expression>HelloWorldTopic</topic_expression>
19                    <enable_discovery_protection>true</enable_discovery_protection>
20                    <enable_liveliness_protection>false</enable_liveliness_protection>
21                    <enable_read_access_control>true</enable_read_access_control>
22                    <enable_write_access_control>true</enable_write_access_control>
23                    <metadata_protection_kind>ENCRYPT</metadata_protection_kind>
24                    <data_protection_kind>ENCRYPT</data_protection_kind>
25                </topic_rule>
26            </topic_access_rules>
27        </domain_rule>
28    </domain_access_rules>
29</dds>
-
对 DomainParticipant 的权限进行细分定制,包括当前 participant 对各 Topic 的“订阅权限”,“发送权限”;
1
2
3
4
5
6
7
8
9
10
11
12
13
14
15
16
17
18
19
20
21
22
23
24
25
26
<dds xmlns:xsi="http://www.w3.org/2001/XMLSchema-instance"
 2    xsi:noNamespaceSchemaLocation="http://www.omg.org/xxx">
 3    <permissions>
 4        <grant name="PublisherPermissions">
 5            <subject_name>emailAddress=xxx</subject_name>
 6            <validity>
 7                <not_before>2013-06-01T13:00:00</not_before>
 8                <not_after>2038-06-01T13:00:00</not_after>
 9            </validity>
10            <allow_rule>
11                <domains>
12                    <id_range>
13                        <min>0</min>
14                        <max>230</max>
15                    </id_range>
16                </domains>
17                <publish>
18                    <topics>
19                        <topic>HelloWorldTopic</topic>
20                    </topics>
21                </publish>
22            </allow_rule>
23            <default>DENY</default>
24        </grant>
46    </permissions>
47</dds>
数据加密
-
提供的能力
提供加解密相关工具,封装加解密,Hash,密钥生成,签名验证等能力;默认使用 AES-GCM-128 加密方式,以及 GMAC 消息验证码;
本插件需要和“身份鉴定”以及“访问控制”插件配合使用;
-
配置
1
emplace_back("dds.sec.crypto.plugin", "builtin.AES-GCM-GMAC");
安全日志
记录上述所有的涉及安全的事件日志,方便安全行为分析,以及错误分析;
-
Level Definition EMERGENCY_LEVELSystem is unusable. Should not continue use. ALERT_LEVELShould be corrected immediately. CRITICAL_LEVELA failure in primary application. ERROR_LEVELGeneral error conditions. Default value. WARNING_LEVELMay indicate future error if action not taken. NOTICE_LEVELUnusual, but nor erroneous event or condition. INFORMATIONAL_LEVELNormal operational. Requires no action. DEBUG_LEVELNormal operational. -
日志配置
1
2
3
4
5
6
7
8
9
10
11
DomainParticipantQos pqos;
pqos.properties().properties().emplace_back("dds.sec.log.plugin",
        "builtin.DDS_LogTopic");

pqos.properties().properties().emplace_back(
    "dds.sec.log.builtin.DDS_LogTopic.logging_level",
    "EMERGENCY_LEVEL");

pqos.properties().properties().emplace_back(
    "dds.sec.log.builtin.DDS_LogTopic.log_file",
    "myLogFile.log");
数据标签
数据标签插件在 FastDDS 中还未实现,未来会有实现可用;
动态数据类型
动态数据类型 提供动态的方式定义 Topic 以及 TopicData,而不用提前定义 IDLs,对一些动态要求较高的场景下比较合适;
详细文档: Extensible and Dynamic Topic Types for DDS
相关依赖
| 库 | 简介 |
|---|---|
| Asio | 用于网络和低级 I/O 编程的跨平台 C++ 库,它使用现代 C++ 方法为开发人员提供一致的异步模型。 |
| TinyXML2 | 开源、简单、小巧、高效的C++ XML解析器,它只有一个.h文件和一个.cpp文件组成。 |
| OpenSSL | |
| Foonathan memory | 内存分配器 |
| Fast CDR | FastDDS 使用的高效序列化库; 性能比较: Apache Thrift vs Protocol Buffers vs Fast Buffers |
| Fast DDS-Gen | 一个 Java 应用程序,它根据接口描述语言 (IDL) 文件中定义的数据类型自动生成 C++ 源代码。 |